Digi-Sign, The Certificate Corporation
Published on Digi-Sign, The Certificate Corporation (http://www2.digi-sign.com)

Home > Configuring the 2X Application Server to Use Digi-Access™

By Digi-Sign
Created May 15 2010 - 17:04

Configuring the 2X Application Server to Use Digi-Access™

Step-by-step instructions on how to enable Digi-Access™

Allow
30 Minutes


Enabling Digi-Access™ client certificates for two factor authentication will take 30 minutes (or less). Configure the 2X Application Server by following these simple steps (for full detailed instructions and screenshots, read the IIS Support [1] pages):

IIS [1]

1. Download and save these two certificates:

   Digi-Sign Root CA [2]

   Digi-Sign CA Digi-Access™ Xs [3]

2. On the server, click the Start button, select Run and type MMC, before clicking the 'OK' button

3. You should now be in the Microsoft Management Console and should follow these steps:

  • Click File and select Add/Remove Snap-in

  • Select Add, select Certificates from the Add Standalone Snap-in box and click Add

  • Select Computer Account, then Local Computer and click Finish

  • Close the Add Standalone Snap-in box and click OK in the Add/Remove Snap-in

  • Return to the Microsoft Management Console

4. Now all you need to do is import the Digi-Access™ Root certificate, following these steps:

  • Right click the Trusted Root Certification Authorities, select All Tasks, and then select Import

  • After clicking Next > you should browse to the Digi-Sign Root CA [2]

  • Ensure that the Digi-Sign Root CA certificate appears under Trusted Root Certification Authorities

  • Then click Next > and then Finish

5. Then import the Digi-Access™ intermediate CA certificate, as follows:

  • Right click the Intermediate Certification Authorities, select All Tasks, and then select Import

  • After clicking Next > you should browse to the Digi-Sign CA Digi-Access Xs [3]

  • Ensure that the Digi-Sign CA Digi-Access Xs appears under Intermediate Certification Authorities

  • Then click Next > and then Finish

  • Restart the IISAdmin service, or reboot the computer to complete the installation

6. Go to Windows Administrative Tools and open the properties window for the website that you have enabled SSL on. Open the Directory Security by right clicking on the Directory Security tab and then follow these steps:

  • Click Edit in the Anonymous access and authentication control section. The Authentication Methods window will appear

  • Make sure that all options (check boxes) in this section are disabled, including the Anonymous Access, Basic Authentication, Digest Authentication and Integrated Windows Authentication

  • Click OK to apply changes

  • Click Edit in Secure communications section and the Secure Communications window will appear

  • Ensure that both the 'Require secure channel (SSL)' option and the 'Require 128-bit encryption' option are enabled

  • Then ensure that the 'Enable client certificate mapping' option is enabled and that the 'Ensure that Enable certificate trust list' option is enabled

  • Move to the 'Under Current CTL' and click New, followed by Next > and a Certificate Trust List Wizard window will appear

  • Browse for the Digi-Sign_Root_CA.cer Certificate file and click Open, followed by Next>

  • In the Friendly Name field enter: Digi-Access

  • In the Description field enter: Digi-Access Two Factor Client Authentication

  • Click Next > and then Finish

  • You should now see your Certificate Trust List [CTL] List on the Secure Communications window

  • Click OK and then OK again

7. Start Internet Services Manager, or open the MMC that contains the IIS snap-in.

  • Right-click the Web site for which you want to configure authentication (for example, Default Web Site), and then click Properties

  • Click the Directory Security tab, and then under Secure communications, click Edit

  • Click to select the Enable client certificate mapping check box, and then click Edit

  • Click the Many-to-1 tab, and then click Add

  • In the General dialog box, type 'Digi-Access' as the name for the rule, and then Next

  • In the Rules dialog box, click New

  • In the Edit Rule Element dialog box that appears, configure the settings that you want for the rule

    There are two fields from client certificates that can be used as criteria for many-to-one rules:

    * Issuer - This field specifies information about the Certification Authority [CA] that issued the Digi-Access™ certificate

    * Subject - This field specifies information about the entity to whom the Digi-Access™ certificate was issued

    Each of these fields can contain common LDAP sub fields for example:

           * CN = commonName (for example, "Bob Smith")
           * OU = organizationalUnitName (for example, "Sales")
           * OU = organizationalUnitName [4] (for example, "2xacme")
           * OU = organizationalUnitName [4] (for example, "2x10003")
           * O = organizationName (for example, "Acme, Inc.")
           * L = localityName (for example, "Dublin")
           * S = stateOrProvinceName (for example, "Dublin")
           * C = countryName (for example, "IE")


    To create a mapping, you create a rule based on a field/subfield pair for a specific value. For example, you could create a rule that matched the Subject's O subfield with 'Acme' to allow access to all clients with certificates that were issued for the Acme organization. This effectively eliminates client connections from any clients that are not part of the Acme organization.

    When finished creating the rule settings, click OK, and then click Next


    IMPORTANT NOTE:- In addition to the above parameters you enter, two additional rule sets will be generated by the Registration Authority [RA] that will be used to distribute [5] the end users' Digi-Access™ certificates. These two rule sets are based on Organizational Unit Name [OU] fields and will be 'silently' pre-appended to each Digi-Access™ Certificate issued by the Digi-Access™ CA.

    These OU field values distinguish end users as belonging to your specific user domain. You must obtain these values from Digi-Access™ RA Certificate Management Console where these two rule sets can be found in the Certificate Manager's 'Distinguished Name' policy configuration.

  • In the Mapping dialog box, click Accept this certificate for Logon Authentication, and then in the Account box, type, or click Browse to browse to the Windows user account that you want to map. Type the password of the user account in the Password box.

  • Click OK three times, and then quit Internet Services Manager, or close the IIS snap-in


How to get the 2X Digi-Access™ OU Codes

Read these instructions to find the OU Codes [4] for your customer.

How to get the 2X Digi-Access™ DN Codes

Instructions on how to get the unique Digi-Access™ DN Codes

Allow
5 Minutes


For every 2X Digi-Access™ customer, a unique Digi-Access™ RA is activated so that the customer can manage the end users Digi-Access™ certificates. Once the order [6] for your customer has been approved, the Digi-Access™ RA is activated and you are notified automatically.

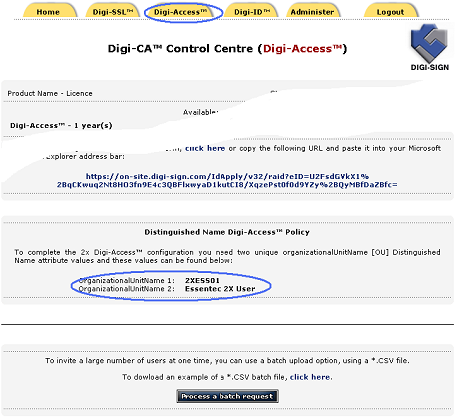
To complete the 2X Application Server configuration you require the two unique organizationalUnitName [OU [7]] codes. These are provided automatically in the Digi-Access™ tab of the Digi-CA™ Control Centre (Digi-Access™):


Depending on the level of service you are providing to your customer either you:

1. will have access to the Digi-Access™ RA because you are managing and issuing certificates to the end users; or

2. your customer's Administrator is managing the certificates and therefore you do not have access to the Digi-Access™ RA

In the case where you do not have access the to Digi-Access™ RA, ask your customer's Administrator to provide the organizationalUnitName 1 and organizationalUnitName 2 cosdes as shown on the Digi-Access™ tab of the Digi-CA™ Control Centre (Digi-Access™)

  • IIS Implementation Guide

Source URL: http://www2.digi-sign.com/arp/2x/help/configure

Links:
[1] http://www2.digi-sign.com/support/digi-access/iis
[2] http://www.digi-sign.com/downloads/certificates/dsroot/Digi-Sign_Root_CA.cer
[3] http://www.digi-sign.com/downloads/certificates/digi-access/Digi-Sign_CA_Digi-Access_Xs.cer
[4] http://www2.digi-sign.com/arp/2x/help/ou
[5] http://www2.digi-sign.com/digi-access/distribute
[6] http://www2.digi-sign.com/arp/ordering
[7] http://www2.digi-sign.com/arp/2x/help/configure#ou