
 [1] [1] |
 [2] [2] |
|
| Digi-Access™ Setup & Implementation on Microsoft IIS Web Server [1] | Download the IIS Error 403 Pages [2] |
 [3] [3] |
 [4] [4] |
|
|
Digi-Access™ Setup and Implementation on Citrix Access Gateway [3] |
Digi-Access™ Setup & Implementation on Apache 1.3 (mod_ssl) Web Server [4] |
Digi-Access™ can be used on more than 27 of the popular web server software available in the market today. The most commonly used are the three listed below, for which, complete installation and implementation guides are provided.
You can return 'Up' to the main Support section of the entire site or continue browsing by using the links below. And remember, to get the most extensive help file access and or to contribute, Login [5] or Register [6]
| Allow 10 Minutes |
 |
|
Microsoft® IIS server has specific default error pages designed to work with Digi-Access™ certificates. To enhance the user experience you should replace these default error pages with the customised Digi-Access™ error 403 pages [2].
The error handlers within IIS display default error pages depending on the specific issue that occurs on the server. The error message on each of these pages and their purpose are explained below.
Most error pages on IIS can be customised [7]. The default 403 error pages that relate to the use of Digi-Access™ are stored in the C:\WINDOWS\help\iisHelp\common\ folder. The server Administrator should download the Digi-Access™ error 403 pages [2] and place them in a new folder: (e.g. C:\WINDOWS\help\iisHelp\digi-access\ ). The server should be configured to display these new error pages before being restarted to complete the setup procedure.
| Allow 5 Minutes |
|
|
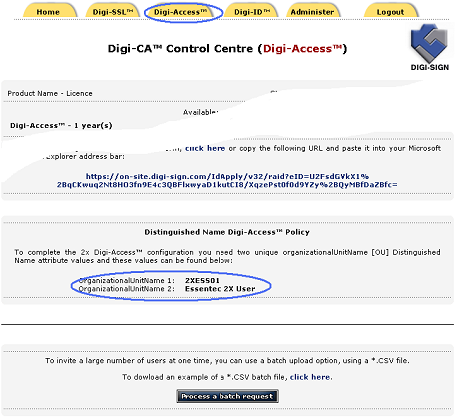
For every Digi-Access™ customer, a unique Digi-Access™ RA is activated so that the customer can manage the end users Digi-Access™ certificates. Once the [13]order for your customer has been approved, the Digi-Access™ RA is activated and you are notified automatically.
To complete the server configuration you require the two unique organizationalUnitName [ [14]OU] codes. These are provided automatically in the Digi-Access™ tab of the Digi-CA™ Control Centre (Digi-Access™):
1. will have access to the Digi-Access™ RA because you are managing and issuing certificates to the end users; or
2. your customer's Administrator is managing the certificates and therefore you do not have access to the Digi-Access™ RA
In the case where you do not have access the to Digi-Access™ RA, ask your customer's Administrator to provide the organizationalUnitName 1 and organizationalUnitName 2 codes as shown on the Digi-Access™ tab of the Digi-CA™ Control Centre (Digi-Access™)
1.Enabling SSL communication security on IIS 5.x+ web server
1.1. Generating a Certificate Signing Request (CSR) using Microsoft IIS 5.x+
1.2. Installing your Digi-SSL™ Certificate on Microsoft IIS 5.x+
1.2.1 Installing the Root & Intermediate Certificates
1.2.2 Installing your Digi-SSL™ Certificate
2. Enabling Client Certificate Authentication on IIS 5.x+ web server
2.1 Obtaining the Digi-Sign Certification Authority Certificate
2.2 Preparing IIS 5.x+ for Digi-Access™ Client Certificate Authentication
3. Obtaining a Digi-Access™ [15] Client Certificate from Digi-Sign
3.1 Applying for a Digi-Access™ Certificate
3.2 Activating and Installing a Digi-Access™ Certificate
4. Setting up a Digi-Access™ User
4.1 Setting up a Windows Local/Active Directory Domain User Account
4.1.1 Setting up a Windows Local User Account
4.1.2 Setting up a Windows Active Directory User Account
4.2 Setting up a Client Certificate Mapping – Digi-Access™ User on IIS 5.x+
To enable the SSL facility on your website using IIS 5.x+, a Digi-SSL™ certificate is necessary. To obtain your Digi-SSL™ certificate, a Certificate Signing Request [CSR] is required. A CSR is your server's unique "fingerprint" and is generated from your server.
The next section will explain in detail how to generate a CSR.
1.1 Generating a Certificate Signing Request (CSR) using Microsoft IIS 5.x+
To generate keys (private and public) and Certificate Signing Request:
Go to Windows Administrative Tools.


When you make your application, make sure you include the CSR in its entirety into the appropriate section of the Digi-SSL™ web application form – including:
-----BEGIN CERTIFICATE REQUEST-----to-----END CERTIFICATE REQUEST-----
You may also backup your private key, which will allow you to restore your certificate in case of any system or registry damage.
To save your private key:
We recommend that you make a note of your password and backup your key as these are known only to you. A floppy diskette or other removable media (CD-ROM, CD-RW) is recommended for your backup files.
You will receive 3 Certificates from Digi-Sign. Save these Certificates to the desktop
(or another directory on the hard drive) of the web server machine, then:
To install the UTN-USERFirst-Hardware.crt Certificate file:


- Click Next.

- Locate the UTN-USERFirst-Hardware.crt Certificate file and click Next.
- When the wizard is completed, click Finish.
To install the Digi-SignCADigi-SSLXp.crt or Digi-SignCADigi-SSLXs.crt:

- Complete the import wizard again, but this time locating the Digi-SignCADigi-SSLXp.crt or Digi-SignCADigi-SSLXs.crt when prompted for the Certificate file.
- Ensure that the UTN-USERFirst-Hardware.crt certificate appears under Trusted Root Certification Authorities.
- Ensure that the Digi-SignCADigi-SSLXp.crt or Digi-SignCADigi-SSLXs.crt appears under Intermediate Certification Authorities.
To install the Digi-SSL™ certificate:
Go to Windows Administrative Tools.

- Open the properties window for the website that you have generated the CSR on. You can do this by right clicking on the Default Website and selecting Properties from the menu.
- Open Directory Security by right clicking on the Directory Security tab.

- Click Server Certificate. The Wizard will appear.

- Choose to Process the Pending Request and Install the Certificate. Click Next.
- Enter the location of your certificate (you may also browse to locate your certificate file), and then click Next.
- Read the summary screen to be sure that you are processing the correct certificate, and then click Next.
- You will see a confirmation screen. When you have read this information, click Next.
- You now have a Digi-SSL™ server certificate installed.
Important: You must now restart the IISAdmin service or reboot the computer to complete the installation.
You may want to test the Web site to ensure that everything is working correctly. Be sure to use https:// when you test connectivity to the site.
To enable Client Certificate Authentication on IIS 5.x+ you will need to obtain Certification Authority [CA] Certificates, your own Digi-Access™ [15] Client Certificate and setup a local user (or Active Directory Domain) account on a Windows Server that the IIS 5.x+ web server is installed and running on.
2.1 Obtaining and installing the Digi-Access™ Certification Authority Certificates
Digi-Sign Root CA [16]
To obtain the Digi-Access™ Intermediate Certification Authority Certificate, use the following URL:
Digi-Sign CA Digi-Access Xs [17]
Once you save these Certificates to the desktop (or another directory on the hard drive) of the web server machine, then:
To install the Digi-Sign_Root_CA.cer Certificate file:
- Click Next.
- Locate the Digi-Sign_Root_CA.cer Certificate file and click Next.
- When the wizard is completed, click Finish.
To install the Digi-Sign_CA_Digi-Access_Xs.cer:
- Complete the import wizard again, but this time locating the Digi-Sign_CA_Digi-Access_Xs.cer when prompted for the Certificate file.
- Ensure that the Digi-Sign_Root_CA.cer certificate appears under Trusted Root Certification Authorities.
- Ensure that the Digi-Sign_CA_Digi-Access_Xs.cer appears under Intermediate Certification Authorities.
Important: You must now restart the IISAdmin service or reboot the computer to complete the installation.
2.2 Preparing IIS 5.x+ for Digi-Access™ Client Certificate Authentication
To prepare IIS 5.x+ for Digi-Access™ Client Certificate Authentication:
Go to Windows Administrative Tools.


Your IIS 5.x+ web server is now ready to start working with Digi-Access™ Client Certificate Authentication.
To enable Client Certificate Authentication on IIS 5.x+ you will need to obtain Certification Authority [CA] Certificates, your own Digi-Access™ [15] Client Certificate and setup a local user (or Active Directory Domain) account on a Windows Server that the IIS 5.x+ web server is installed and running on.
2.1 Obtaining and installing the Digi-Access™ Certification Authority Certificates
Digi-Sign Root CA [19]
To obtain the Digi-Access™ Intermediate Certification Authority Certificate, use the following URL:
Digi-Sign CA Digi-Access Xs [20]
Once you save these Certificates to the desktop (or another directory on the hard drive) of the web server machine, then:
To install the Digi-Sign_Root_CA.cer Certificate file:
- Click Next.
- Locate the Digi-Sign_Root_CA.cer Certificate file and click Next.
- When the wizard is completed, click Finish.
To install the Digi-Sign_CA_Digi-Access_Xs.cer:
- Complete the import wizard again, but this time locating the Digi-Sign_CA_Digi-Access_Xs.cer when prompted for the Certificate file.
- Ensure that the Digi-Sign_Root_CA.cer certificate appears under Trusted Root Certification Authorities.
- Ensure that the Digi-Sign_CA_Digi-Access_Xs.cer appears under Intermediate Certification Authorities.
Important: You must now restart the IISAdmin service or reboot the computer to complete the installation.
2.2 Preparing IIS 5.x+ for Digi-Access™ Client Certificate Authentication
To prepare IIS 5.x+ for Digi-Access™ Client Certificate Authentication:
Go to Windows Administrative Tools.
Your IIS 5.x+ web server is now ready to start working with Digi-Access™ Client Certificate Authentication.
3.1 Applying for a Digi-Access™ Certificate
To obtain a Digi-Access™ Client Certificate from Digi-Sign, you need to send an email request to
support@digi-sign.com [21] providing your (or the end users) first name, last name and email address. Digi-Sign will then send you (or to any user you requested) a Digi-Access™ invitation email message containing instructions on how to apply for a Digi-Access™ certificate and the relevant Digi-Access™ web application URL.
NOTE: If you already supplied a full list of Digi-Access™ end users to Digi-Sign, you will not be requested to send a request email to our Support Department for each of these users.
Once entered the web application form the user is asked for specific personal information that is going to be inserted into his/her certificate.
Each of the above fields has an on-line help available explaining precisely how to fill it or which option to enable.

Setting up a Digi-Access™ user requires a Windows Local or Active Directory Domain (depending on the Windows Server configuration) User account, and a Digi-Access™ [15] certificate containing the public key.
Based on the TTM™ [22] (Total Trust Management) agreement between Digi-Sign and the company which uses
Digi-Access™ facility, Digi-Sign will automatically send the user’s Digi-Access™ Certificate containing only the public key to the Digi-Access™ Administrator.
The user's Digi-Access™ Certificate file will be sent as an email attachment and should be saved on/uploaded to the Windows Server where the Digi-Access™ has been installed.
Further actions with the user's Digi-Access™ Certificate will be described later in this document in section 4.2.
Depending on your Windows Server setup you can choose a Windows Local User Account setup, section 3.1.1 or if you have a Windows Active Directory present, you may choose Windows Active Directory User Account setup, section 3.1.2.
Log on as an Administrator to the Windows Server where Digi-Access™ is setup and:
Go to Windows Administrative Tools.
- Start Computer Management.

- From the Computer Management (Local) tree, select Local Users and Groups.
- Right click on Users and choose New user from the menu.

- Provide User Name, for example: user1
- Provide Full Name, which will be the first and the last name of the end user.
- Provide a short Description for the user account, for example: Digi-Access user
- Provide and confirm the Password for the user account. You also need to write down this password for later usage – this password will be needed when a Digi-Access™ Client Certificate Mapping will be setup on IIS 5.x+, which is described later in this document in section 4.2.
- Ensure that the User must change password after first log on option is disabled.
- Ensure that the User cannot change password and Password never expires options are enabled.
- Complete the setup by clicking the Create button and then click the Close button.
The Windows Local User Account is now created.
Log on as a Domain Administrator to the Windows Server where Windows Active Directory is installed on and the Windows server containing the Digi-Access™ facility is connected to and:
Go to Windows Administrative Tools.


The Windows Active Directory User Account is now created.
Once the Windows User Account (from section 3.1) is present, you may move to the final step of this document where you setup a Digi-Access™ user. Before you do this, make sure that you have the following items available:
The file should be previously saved on the Windows server as described at the beginning of section 3.
To complete the setup of a Digi-Access™ user:


The Digi-Access™ user setup is now completed. The user may now connect to your
Digi-Access™ protected web site using your web site URL with the https:// phrase typed before the web site name.
Once connected to the site, user will be asked for a Digi-Access™ Client Certificate and if the Digi-Access™ Certificate is present on the user’s machine, access to the web site will be granted, otherwise the user will be not allowed to enter your web site.
For any technical information which is not included in this document, or for further technical support, contact our Support Department by email at support@digi-sign.com [21] or by telephone: +353-1-410-0701.
Thank you for your Custom!
Digi-Sign Technical Department
E: support@digi-sign.com [21]
W: http://www.digi-sign.com [23]
T: +48 22 789 64 92
F: +48 22 789 64 91

Digi-Access™ Setup and Implementation on Apache 1.3 (mod_ssl) Web Server
1. Enabling SSL communication security on Apache 1.3 web server
1.1 Generating a Certificate Signing Request (CSR) using Apache 1.3
1.2 Installing your Digi-SSL™ Certificate on Apache 1.3
1.2.1 Installing your Digi-SSL™ Certificate
1.2.2 Installing the CA Chain file containing the Root & Intermediate Certificates
2. Enabling Client Certificate Authentication on Apache web server
2.1 Obtaining the Digi-Sign Certification Authority Certificate Chain
2.2 Configuring Apache 1.3 for Digi-Access™ Client Certificate Authentication
3. Obtaining a Digi-ID™ [24] Client Certificate from Digi-Sign
3.1 Applying for a Digi-ID™ Certificate
3.2 Activating and Installing a Digi-ID™ Certificate
Table 1 - Standard CGI/1.0, Apache and SSL related variables
Table 2 - SSI/CGI Environment Variables 10
To enable the SSL facility on Apache 1.3, an SSL (Digi-SSL™) certificate is required.
Digi-SSL™ certificate can be obtained directly from Digi-Sign and requires a CSR (Certificate Signing Request) code.
A CSR is a file/string containing your certificate application information, including your Public Key, Company Name and the Common Name (in most cases FQDN - Fully Qualified Domain Name host name).
Generate your CSR and then copy and paste the contents of the CSR file into the
Digi-Sign Digi-SSL™ web application form:
https://www.digi-sign.com/order/digi-ssl/index.php [25]
To generate keys (private and public) and Certificate Signing Request do:
For a 128 bit Certificate:
openssl req -new -newkey rsa:1024 -keyout myserver.key -nodes -out server.csr
For a 256 bit Certificate:
openssl req -new -newkey rsa:2048 -keyout myserver.key -nodes -out server.csr
This creates two files. The file myserver.key contains a private key; do not disclose this file to anyone. Carefully protect the private key.
In particular, be sure to backup the private key, as there is no means to recover it should it be lost. The private key is used as input in the command to generate a Certificate Signing Request (CSR).
You will now be asked to enter details to be entered into your CSR. What you are about to enter is what is called a Distinguished Name or a DN.
For some fields there will be a default value, If you enter '.', the field will be left blank.
Please enter the following 'extra' attributes to be sent with your certificate request
A challenge password []:
An optional company name []:
-----
Use the name of the web server as Common Name (CN). If the domain name is mydomain.com append the domain to the hostname (use the fully qualified domain name).
The fields email address, optional company name and challenge password can be left blank for a web server certificate.
Your CSR will now be created. Open the server.csr in a text editor and copy and paste the contents into the online enrolment form when requested.
When you make your application, make sure you include the CSR in its entirety into the appropriate section of the Digi-SSL™ web application form – including:
You will receive 2 Certificates from Digi-Sign. When viewed in a text editor, these certificates will look something like:
Save/upload these Certificates to the web server configuration directory (or other safe directory on the server hard drive that you will be using to hold your certificates). In this example we will use /etc/ssl/crt/. Both the public and private key files will already be in this directory. The private key used in the example will be labeled private.key and the public key will be yourdomainname.cer.
It is recommended that you make the directory that contains the private key file only readable by root.
You will need to install the chain certificates (root and intermediates) in order for browsers to trust your certificate.
As well as your Digi-SSL™ certificate (yourdomainname.cer), two other certificates, named UTN-USERFirst-Hardware.crt and Digi-SignCADigi-SSLXp.crt or Digi-SignCADigi-SSLXs.crt, might also be attached to the email from Digi-Sign.
Apache users will not require these certificates. Instead you can install the root and intermediate certificates (CA Chain) using a 'bundle' file method. The CA 'bundle' file - in most cases will be attached to the email from Digi-Sign, however you can also download it from the following URLs:
CA Bundle for Digi-Acess™ setup with Digi-SSL™ Xp CA:
http://www.digi-sign.com/downloads/certificates/digi-access/BundledCAXp.pem [26]
CA Bundle for Digi-Acess™ setup with Digi-SSL™ Xs CA:
http://www.digi-sign.com/downloads/certificates/digi-access/BundledCAXs.pem [27]
In the Virtual Host settings for your site, in the httpd.conf file (or other file where you keep your Virtual Host configuration), you will need to complete the following:
If you are using a different location and certificate file names you will need to change the path and filename to reflect your server.
The SSL section of the updated httpd config file should now read similar to this example (depending on your naming and directories used):
SSLCertificateKeyFile /etc/ssl/crt/private.key
SSLCACertificateFile /etc/httpd/conf/ca-bundle/BundledCA.cer
Important: Save your httpd.conf file and restart Apache.
To enable Client Certificate Authentication on Apache 1.3 you will need to obtain your own Digi-ID™ [24] Client Certificate, Certification Authority Certificate Chain (CA Chain) and setup Authentication Rules using the httpd.conf file and Apache configuration directives.
Since Apache is using the SSLCACertificateFile configuration directive to point to the Certification Authority Chain for both SSL Certificates [28] and Client Certificate Authentication, assuming you have already setup this directive in step 1.2.2, you can omit this section.
If however, you have not obtained/received the ca-bundle file, you may download it from the following URLs:
CA Bundle for Digi-Acess™ setup with Digi-SSL™ Xp CA:
http://www.digi-sign.com/downloads/certificates/digi-access/BundledCAXp.pem [26]
CA Bundle for Digi-Acess™ setup with Digi-SSL™ Xs CA:
http://www.digi-sign.com/downloads/certificates/digi-access/BundledCAXs.pem [27]
To configure Apache, do:
- Open for editing the httpd.conf Apache configuration file
- Locate the Virtual Host section for your SSL secured site
- You will need to decide whether you wish to secure the entire site or just a particular directory. Both options will use the same Apache configuration directives, however if you wish to implement per directory authentication, you will need to add all of the necessary directives below into the specified directory options section, i.e. within the following directory directives:
- Add the following directive line into your site/directory configuration section:
SSLOptions +StdEnvVars +ExportCertData
This directive can be used to control various run-time options on a per-site and per- directory basis. Normally, if multiple SSLOptions could apply to a directory, then the most specific one is taken completely; the options are not merged. However if all the options on the SSLOptions directive are preceded by a plus (+) or minus (-) symbol, the options are merged. Any options preceded by a (+) are added to the options currently in force, and any options preceded by a (-) are removed from the options currently in force.
When the option StdEnvVars is enabled, the standard set of SSL related CGI/SSI environment variables are created. This per default is disabled for performance reasons, because the information extraction step is a rather expensive operation. Enable this option for CGI and SSI requests only.
When the option ExportCertData is enabled, additional CGI/SSI environment variables are created: SSL_SERVER_CERT, SSL_CLIENT_CERT and SSL_CLIENT_CERT_CHAIN (with n = 0,1,2,..). These contain the PEM-encoded X.509 Certificates of server and client for the current HTTPS connection and can be used by CGI scripts for deeper Certificate checking. Additionally all other certificates of the client certificate [18] chain are provided, too. This bloats up the environment a little bit which is why you have to use this option to enable it on demand.
The expression must match the following syntax (given as a BNF grammar notation):
comp ::= word "==" word | word "eq" word
| word "!=" word | word "ne" word
| word "<" word | word "lt" word
| word "<=" word | word "le" word
| word ">" word | word "gt" word
| word ">=" word | word "ge" word
| word "in" "{" wordlist "}"
| word "=~" regex
| word "!~" regex
wordlist ::= word
| wordlist "," word
word ::= digit
| cstring
| variable
| function
digit ::= [0-9]+
cstring ::= "..."
variable ::= "%{" varname "}"
function ::= funcname "(" funcargs ")"
while for varname any variable from Table 1 can be used. Finally for funcname the following functions are available: file(filename)
This function takes one string argument and expands to the contents of the file. This is especially useful for matching these contents against a regular expression, etc.
Notice that expression is first parsed into an internal machine representation and then evaluated in a second step. Actually, in Global and Per-Server Class context expression is parsed at start-up time and at runtime only the machine representation is executed. For Per-Directory context this is different: here expression has to be parsed and immediately executed for every request.
For more information about the above directive, visit the Apache home website (http://www.apache.org [29]) or contact Digi-Sign Support at support@digi-sign.com [21]
- Some Apache versions, depending if you are implementing a CGI application with
Digi-Access™ may require the following directive to be present:
This directive defines environment variables based on attributes of the request. These attributes can be the values of various HTTP request header fields (see RFC2616 (http://www.rfc-editor.org/rfc/rfc2616.txt [30]) for more information about these), or of other aspects of the request, including the following:
If the attribute name doesn't match any of the special keywords, nor any of the request's header field names, it is tested as the name of an environment variable in the list of those associated with the request. This allows SetEnvIf directives to test against the result of prior matches.
Only those environment variables defined by earlier SetEnvIf[NoCase] directives are available for testing in this manner. 'Earlier' means that they were defined at a broader scope (such as server-wide) or previously in the current directive's scope.
Important: Save your httpd.conf file and restart Apache.

Citrix Access Gateway
1. Enabling SSL communication security on Citrix Access Gateway
1.1. Generating a Certificate Signing Request (CSR) using Citrix Access Gateway
1.2. Installing your Digi-SSL™ Certificate on Citrix Access Gateway
1.2.1. Installing your Digi-SSL™ Certificate
1.2.2. Installing the CA Certification Path containing the Root & Intermediate CA Certificates
2. Requiring Client Certificates for Authentication
2.1. Defining Client Certificate Criteria
2.2. Using Client Certificates with Access Gateway Advanced Edition
2.3. Selecting an Encryption Type for Client Connections
3. Obtaining a Digi-Access™ Client Certificate from Digi-Sign
3.1. Applying for a Digi-Access™ Certificate
3.2. Activating and Installing a Digi-Access™ Certificate
To enable the SSL facility on Citrix Access Gateway, an SSL (Digi-SSL™) certificate is required.
Digi-SSL™ certificate can be obtained directly from Digi-Sign and requires a CSR (Certificate Signing Request) code.
A CSR is a file/string containing your certificate application information, including your Public Key, Company Name and the Common Name (mostly FQDN - Fully Qualified Domain Name host name).
Generate your CSR and then copy and paste the contents of the CSR file into the Digi-Sign Digi-SSL™ web application form:
or send the CSR via email to your account manager in Digi-Sign.
Overview of the Certificate Signing Request
Before you can upload a certificate to the Access Gateway, you need to generate a Certificate Signing Request (CSR) and private key. The CSR is created using the Certificate Request Generator included in the Administration Tool. The Certificate Request Generator is a wizard that creates a .csr file. When the file is created, it is emailed to the Certificate Authority [32] (Digi-Sign) for signing or you can paste it into online enrolment form. The Certificate Authority (Digi-Sign) signs the certificate and returns it to you at the email address you provided. When it is received, you can install it on the Access Gateway.
To provide secure communications using SSL/TLS, a server certificate is required on the Access Gateway. The steps required to obtain and install a server certificate on the Access Gateway are as follows:
Private keys that are generated with the Certificate Signing Request are stored in an encrypted and password-protected format on the Access Gateway. When creating the Certificate Signing Request, you are asked to provide a password for the private key. The password is used to protect the private key from tampering and it is also required when restoring a saved configuration to the Access Gateway. Passwords are used whether the private key is encrypted or unencrypted. When you upgrade to Version 4.5 and save the configuration file, it cannot be used on earlier versions of the Access Gateway. If you attempt to upload the Version 4.5 configuration file to an earlier version, the Access Gateway becomes inoperable.
You can also import a password-protected certificate and private key pairs in the PKCS#12 format. This allows encrypted and password-protected private keys and certificates created on the Access Gateway to be imported.
Caution If you save the configuration on Version 4.5 of the Access Gateway, do not install it on an earlier version of the appliance. Because the private key is encrypted in Version 4.5, older versions cannot decrypt it and the appliance becomes inoperable.
The CSR is generated using the Certificate Request Generator in the Administration Tool.
2. On the Certificate Signing Request tab, type the required information in the fields and then click Generate Request.
Note In the field Access Gateway FQDN, type the same FQDN that is on the General Networking tab. In Password, type the password for the private key.
3. A .csr file is created. Save the certificate request on the local computer.
4. Email the certificate to to Digi-Sign or paste it into online enrolment form. Digi-Sign returns a signed certificate to you by email. When you receive the signed certificate, install it on the Access Gateway.
Note: When you save the Access Gateway configuration, any certificates that are already installed are included in the backup.
After you create the certificate request and send it to the Certificate Authority (Digi-Sign), refrain from performing the following tasks on the Access Gateway until you receive the signed certificate back and install it on the appliance:
- Uploading a saved configuration file
- Publishing configuration settings from another appliance in the cluster
To install a certificate file using the Administration Tool
You can also upload the certificate using the Administration Portal.
To install a certificate file using the Administration Tool
You will need to install the chain certificates (certification path) in order for browsers to trust your certificate.
As well as your Digi-SSL™ certificate (yourdomainname.cer), two other certificates, named
UTN-USERFirst-Hardware.crt and Digi-SignCADigi-SSLXp.crt or Digi-SignCADigi-SSLXs.crt, might also be attached to the email from Digi-Sign. Install these by following instructions below.
To install a Root CA Certificate on the Access Gateway
Repeat instructions from step 1 to 4 to install the Digi-Sign Root CA Certificate to enable trust for Digi-Access™ Client Certificates.
If you want additional authentication, you can configure the Access Gateway to require client certificates [18] for authentication.
The Access Gateway can authenticate a client certificate that is stored in either of these locations:
- In a smart card or a hardware token. In this case, the certificate is embedded within the smart card and read from a smart card reader attached to the network.
Note: The Access Gateway is configured in the same way regardless of whether the certificates are stored in the Windows operating system or on a smart card. No special configurations are required to support client certificates stored in either of these locations.
If clients are connecting using kiosk mode or from a Linux computer, client side certificates are not supported. If client certificates are enabled in the Access Gateway, Linux Clients and kiosk mode do not work.
If you configure the Access Gateway to require client certificates, every user who logs on through the Access Gateway must present a secure client certificate. The certificate can originate from the certificate store in Windows or a smart card.
To specify criteria that client certificates must meet, use a Boolean expression. To belong to a group, the user must meet the certificate criteria in addition to passing all other authentication rules that are configured for that group. For example, the following criteria requires that the subject field of the client certificate provided by a user has the Organization Unit (OU) set to Accounting and the Common Name (CN) attribute set to a value matching the user's local user name on the Access Gateway.
client_cert_end_user_subject_organizational_unit="Accounting" and
username=client_cert_end_user_subject_common_name.
Valid operators for the client certificate are as follows:
= equality test
Valid constants for the criteria are:
true logical TRUE
Valid variables for the criteria are:
username local user name on the Access Gateway
client_cert_end_user_subject_common_name CN attribute of the Subject of the client certificate
client_cert_end_user_subject_organizational_unit OU attribute of the Subject of the client certificate
client_cert_end_user_subject_organization O attribute of the Subject of the client certificate
Values for the client certificate criteria require quotation marks around them to work. Correct and incorrect examples are:
The Boolean expression
client_cert_end_user_subject_common_name="clients.gateways.citrix.com" is valid and it works.
The Boolean expression
client_cert_end_user_subject_common_name=clients.gateways.citrix.com is not valid and does not work
To specify client certificate configuration:
Note: Client certificate configuration is not available for the default user group
2. On the Client Certificate tab, under Client certificate criteria expression, type the certificate information. Click OK.
The Access Gateway and the servers running Advanced Edition can both be required to use secure client certificates. Use the following guidelines when configuring for client certificate use:
All communications between the Secure Access Client and the Access Gateway are encrypted with SSL. The SSL protocol allows two computers to negotiate encryption ciphers to accomplish the symmetric encryption of data over a secure connection.
You can select the specific cipher that the Access Gateway uses for the symmetric data encryption on an SSL connection. Selecting a strong cipher reduces the possibility of malicious attack. The security policies of your organization may also require you to select a specific symmetric encryption cipher for secure connections.
Note: If you are using the Access Gateway to provide access to Citrix Presentation Server, ICA traffic transmitted to the Access Gateway is also encrypted using these ciphers.
You can select RC4, 3DES, or AES encryption ciphers for SSL connections. The default setting is RC4 128-bit. The MD5 or SHA hash algorithm is negotiated between the client and the server.
The Access Gateway uses RSA for public key encryption in a secure connection. The encryption ciphers and hash algorithms that you can select for symmetric encryption are listed below:
To select an encryption type for client connections:
At this stage a private key and public key pair is generated and the CSR [34] (Certificate Signing Request) being submitted to the Digi-Sign System along with the users application details.
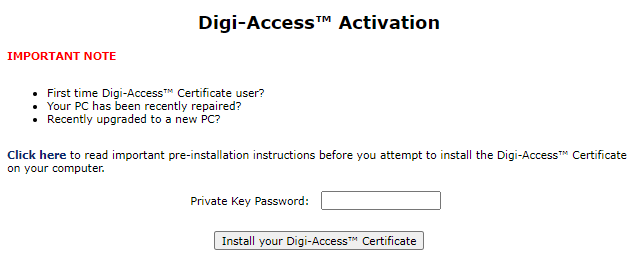
Once the user Digi-Access™ application is approved by Digi-Sign Validations Department, the end user will receive an
e-mail message containing instructions on how to activate and install the Digi-Access™ certificate along with the relevant Digi-Access™ Certificate activation URL.
Once entered the URL, click the Collect your Digi-Access™ Certificate button.
Note: As the private key is stored in the Windows User Account registry container, you (or the end user) need to make sure that you are (or the end user) accessing the Digi-Access™ activation URL using the same PC Computer and Windows User Account, as was originally used to apply for the Digi-Access™ Certificate. It these items do not match, the Digi-Access™ Certificate will not be installed.
The Digi-Access™ Certificate should be now installed on your PC. You may check it by opening Microsoft Internet Explorer browser, entering Tools menu, choosing Internet Options, selecting the Contents tab and clicking the Certificates button. The Digi-Access™ Certificate should be located and shown under the Personal tab.
If you have setup the authentication rules, using the Requiring Client Certificates for Authentication configuration directive in section 2, the Digi-Access™ setup is now completed. The user may now connect to your Digi-Access™ protected web site using your web site URL with the https:// phrase typed before the web site name or using the Citrix Client Application.
Once connected to the Citrix Access Gateway, user will be asked for a Digi-Access™ Client Certificate and if the Digi-Access™ Certificate matching the rules you created is present on the user's machine, access will be granted, otherwise the user will be not allowed to access the particular website or application that is protected with Citrix Access Gateway.
For any technical information which is not included in this document, or for further technical support, contact your appliance vendor or Digi-Sign Support Department by email at support@digi-sign.com [21] or by telephone: +44 (800) 845-6718.
Thank you for your Custom!
Digi-Sign Technical Department
E: support@digi-sign.com [21]
W: http://www.digi-sign.com [23]
| Allow 5 - 60 Minutes |
|
|
The Digi-CA™ [35] Certificate Authority [CA] system (that issues the Digi-Access™ end user certificates) can issue thousands of certificates every hour. This 'endless' capacity means that getting Digi-Access™ certificates to the end users can occur as quickly as your environment demands.
Issuing the Digi-Access™ certificates is a two stage process. In the first stage, the Digi-CA™ Inviting 'action' requires the end user 'reaction' (completing an application form). In the second stage, the Digi-CA™ Approving 'action' requires the end user 'reaction' (activating the certificate) and this completes the process. It is best understood as follows:
How the Digi-Access™ certificates are issued is set by the 'Enrolment Policy'. The options within the Enrolment Policy are designed to be very flexible. They can be customised to meet almost any requirement with many different settings and combinations. The three basic options are:
As stated, because the Enrolment Policy is very flexible, there are many different ways to invite and approve end users certificates. The following is a sample issuing process only. You may wish to include other options, as required.
Using the Digi-CA™ End Entity Account Manager interface, the Administrator uploads a .CSV batch file inviting [36] as many users as required.

The Digi-CA™ system sends an email to each end user with a unique link to the Digi-Access™ certificate enrolment form. Using the link provided in the email, the end user then completes the Digi-Access™ certificate enrolment form.
Note:- this is the default Digi-Access™ End Entity Digital Certificate Enrolment Form. This form uses basic HTML programming that can be altered [37] to match your specific design requirements.

Once the end user completes all the fields and submits the enrolment form to the Digi-CA™ system, the Administrator is notified. The Administrator then approves [38] each end user application using the Digi-Access™ certificate Authorization Panel.
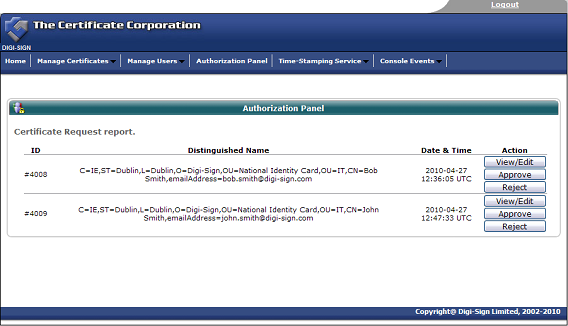
Assuming the Administrator approves the application, the Digi-CA™ system sends a new email to the end user advising them that their application has been approved. Using the link provided in the email, the end user then activates [39] the Digi-Access™ certificate and this completes the issuing process.
| Allow <1 Minute |
|
|
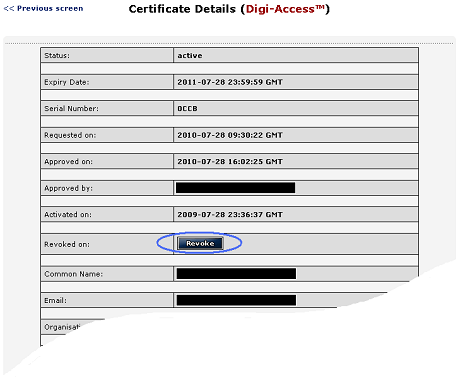
The Digi-CA™ [35] Certificate Authority [CA] system controls the end users' certificates and revoking an end user certificate is simply a case of search, review and then revoke.
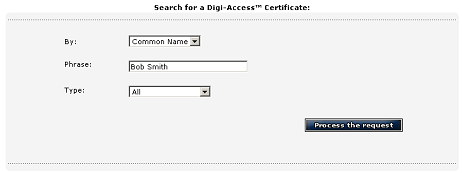
1. Go to the Digi-CA™ Control Centre (Administer) interface and select the 'Search / View / Collect / Revoke' option under the Digi-Access™ Certificate Options section


Links:
[1] http://www2.digi-sign.com/support/digi-access/iis
[2] https://www.digi-sign.com/downloads/download.php?id=digi-access-403
[3] http://www2.digi-sign.com/support/digi-access/citrix
[4] http://www2.digi-sign.com/support/digi-access/apache
[5] http://www2.digi-sign.com/user/login
[6] http://www2.digi-sign.com/user/register
[7] http://technet.microsoft.com/nl-nl/library/cc753103(WS.10).aspx
[8] http://www2.digi-sign.com/403-7.htm
[9] http://www2.digi-sign.com/403-12.htm
[10] http://www2.digi-sign.com/403-13.htm
[11] http://www2.digi-sign.com/403-16.htm
[12] http://www2.digi-sign.com/403-17.htm
[13] http://www2.digi-sign.com/arp/ordering
[14] http://www2.digi-sign.com/digi-access/configure#ou
[15] http://www2.digi-sign.com/digi-access
[16] http://www.digi-sign.com/downloads/certificates/dsroot/Digi-Sign_Root_CA.cer
[17] http://www.digi-sign.com/downloads/certificates/digi-access/Digi-Sign_CA_Digi-Access_Xs.cer
[18] http://www2.digi-sign.com/digital+certificate
[19] https://www.digi-sign.com/downloads/certificates/dsroot/Digi-Sign_Root_CA.cer
[20] https://www.digi-sign.com/downloads/certificates/digi-access/Digi-Sign_CA_Digi-Access_Xs.cer
[21] mailto:support@digi-sign.com
[22] http://www2.digi-sign.com/service/certificate+authority+management+services#ttm
[23] http://www.digi-sign.com
[24] http://www2.digi-sign.com/digi-id
[25] https://www.digi-sign.com/order/digi-ssl/index.php
[26] http://www.digi-sign.com/downloads/certificates/digi-access/BundledCAXp.pem
[27] http://www.digi-sign.com/downloads/certificates/digi-access/BundledCAXs.pem
[28] http://www2.digi-sign.com/ssl+certificate
[29] http://www.apache.org
[30] http://www.rfc-editor.org/rfc/rfc2616.txt
[31] https://www.digi-sign.com/order/digi-ssl/
[32] http://www2.digi-sign.com/certificate+authority
[33] mailto:production@digi-sign.com
[34] http://www2.digi-sign.com/support/digi-ssl/generate+csr
[35] http://www2.digi-sign.com/digi-ca
[36] http://www2.digi-sign.com/digi-access/distribute/invite
[37] http://www2.digi-sign.com/digi-access/distribute/enrol
[38] http://www2.digi-sign.com/digi-access/distribute/policy
[39] http://www2.digi-sign.com/digi-access/distribute/activate
[40] mailto:bsmith@acme.com