


1.Enabling SSL communication security on IIS 5.x+ web server
1.1. Generating a Certificate Signing Request (CSR) using Microsoft IIS 5.x+
1.2. Installing your Digi-SSL™ Certificate on Microsoft IIS 5.x+
1.2.1 Installing the Root & Intermediate Certificates
1.2.2 Installing your Digi-SSL™ Certificate
2. Enabling Client Certificate Authentication on IIS 5.x+ web server
2.1 Obtaining the Digi-Sign Certification Authority Certificate
2.2 Preparing IIS 5.x+ for Digi-Access™ Client Certificate Authentication
3. Obtaining a Digi-Access™ [1] Client Certificate from Digi-Sign
3.1 Applying for a Digi-Access™ Certificate
3.2 Activating and Installing a Digi-Access™ Certificate
4. Setting up a Digi-Access™ User
4.1 Setting up a Windows Local/Active Directory Domain User Account
4.1.1 Setting up a Windows Local User Account
4.1.2 Setting up a Windows Active Directory User Account
4.2 Setting up a Client Certificate Mapping – Digi-Access™ User on IIS 5.x+
To enable the SSL facility on your website using IIS 5.x+, a Digi-SSL™ certificate is necessary. To obtain your Digi-SSL™ certificate, a Certificate Signing Request [CSR] is required. A CSR is your server's unique "fingerprint" and is generated from your server.
The next section will explain in detail how to generate a CSR.
1.1 Generating a Certificate Signing Request (CSR) using Microsoft IIS 5.x+
To generate keys (private and public) and Certificate Signing Request:
Go to Windows Administrative Tools.
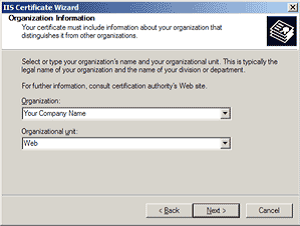
We recommend that you make a note of your password and backup your key as these are known only to you. A floppy diskette or other removable media (CD-ROM, CD-RW) is recommended for your backup files.
You will receive 3 Certificates from Digi-Sign. Save these Certificates to the desktop
(or another directory on the hard drive) of the web server machine, then:
To install the UTN-USERFirst-Hardware.crt Certificate file:
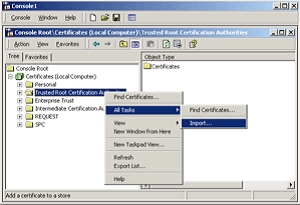
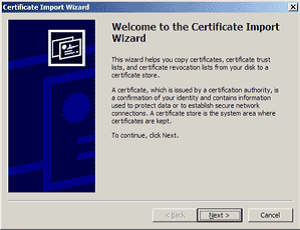
- Click Next.
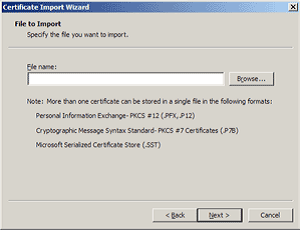
- Locate the UTN-USERFirst-Hardware.crt Certificate file and click Next.
- When the wizard is completed, click Finish.
To install the Digi-SignCADigi-SSLXp.crt or Digi-SignCADigi-SSLXs.crt:
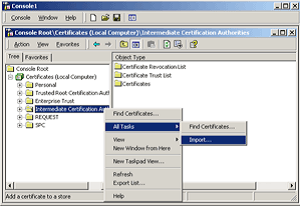
- Complete the import wizard again, but this time locating the Digi-SignCADigi-SSLXp.crt or Digi-SignCADigi-SSLXs.crt when prompted for the Certificate file.
- Ensure that the UTN-USERFirst-Hardware.crt certificate appears under Trusted Root Certification Authorities.
- Ensure that the Digi-SignCADigi-SSLXp.crt or Digi-SignCADigi-SSLXs.crt appears under Intermediate Certification Authorities.
To install the Digi-SSL™ certificate:
Go to Windows Administrative Tools.
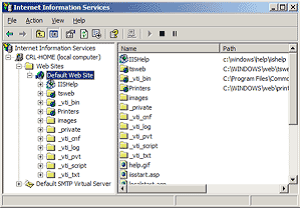
- Open the properties window for the website that you have generated the CSR on. You can do this by right clicking on the Default Website and selecting Properties from the menu.
- Open Directory Security by right clicking on the Directory Security tab.
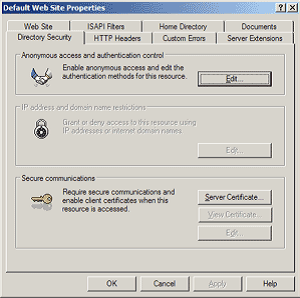
- Click Server Certificate. The Wizard will appear.
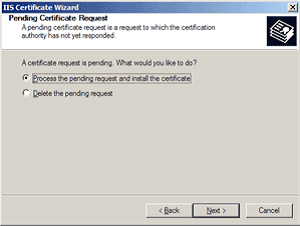
- Choose to Process the Pending Request and Install the Certificate. Click Next.
- Enter the location of your certificate (you may also browse to locate your certificate file), and then click Next.
- Read the summary screen to be sure that you are processing the correct certificate, and then click Next.
- You will see a confirmation screen. When you have read this information, click Next.
- You now have a Digi-SSL™ server certificate installed.
Important: You must now restart the IISAdmin service or reboot the computer to complete the installation.
You may want to test the Web site to ensure that everything is working correctly. Be sure to use https:// when you test connectivity to the site.
To enable Client Certificate Authentication on IIS 5.x+ you will need to obtain Certification Authority [CA] Certificates, your own Digi-Access™ [1] Client Certificate and setup a local user (or Active Directory Domain) account on a Windows Server that the IIS 5.x+ web server is installed and running on.
2.1 Obtaining and installing the Digi-Access™ Certification Authority Certificates
To obtain the Digi-Access™ Intermediate Certification Authority Certificate, use the following URL:
Digi-Sign CA Digi-Access Xs [3]
Once you save these Certificates to the desktop (or another directory on the hard drive) of the web server machine, then:
To install the Digi-Sign_Root_CA.cer Certificate file:


- Click Next.

- Locate the Digi-Sign_Root_CA.cer Certificate file and click Next.
- When the wizard is completed, click Finish.
To install the Digi-Sign_CA_Digi-Access_Xs.cer:

- Complete the import wizard again, but this time locating the Digi-Sign_CA_Digi-Access_Xs.cer when prompted for the Certificate file.
- Ensure that the Digi-Sign_Root_CA.cer certificate appears under Trusted Root Certification Authorities.
- Ensure that the Digi-Sign_CA_Digi-Access_Xs.cer appears under Intermediate Certification Authorities.
Important: You must now restart the IISAdmin service or reboot the computer to complete the installation.
2.2 Preparing IIS 5.x+ for Digi-Access™ Client Certificate Authentication
To prepare IIS 5.x+ for Digi-Access™ Client Certificate Authentication:
Go to Windows Administrative Tools.
Your IIS 5.x+ web server is now ready to start working with Digi-Access™ Client Certificate Authentication.
To enable Client Certificate Authentication on IIS 5.x+ you will need to obtain Certification Authority [CA] Certificates, your own Digi-Access™ [1] Client Certificate and setup a local user (or Active Directory Domain) account on a Windows Server that the IIS 5.x+ web server is installed and running on.
2.1 Obtaining and installing the Digi-Access™ Certification Authority Certificates
To obtain the Digi-Access™ Intermediate Certification Authority Certificate, use the following URL:
Digi-Sign CA Digi-Access Xs [6]
Once you save these Certificates to the desktop (or another directory on the hard drive) of the web server machine, then:
To install the Digi-Sign_Root_CA.cer Certificate file:


- Click Next.

- Locate the Digi-Sign_Root_CA.cer Certificate file and click Next.
- When the wizard is completed, click Finish.
To install the Digi-Sign_CA_Digi-Access_Xs.cer:

- Complete the import wizard again, but this time locating the Digi-Sign_CA_Digi-Access_Xs.cer when prompted for the Certificate file.
- Ensure that the Digi-Sign_Root_CA.cer certificate appears under Trusted Root Certification Authorities.
- Ensure that the Digi-Sign_CA_Digi-Access_Xs.cer appears under Intermediate Certification Authorities.
Important: You must now restart the IISAdmin service or reboot the computer to complete the installation.
2.2 Preparing IIS 5.x+ for Digi-Access™ Client Certificate Authentication
To prepare IIS 5.x+ for Digi-Access™ Client Certificate Authentication:
Go to Windows Administrative Tools.
Your IIS 5.x+ web server is now ready to start working with Digi-Access™ Client Certificate Authentication.
3.1 Applying for a Digi-Access™ Certificate
To obtain a Digi-Access™ Client Certificate from Digi-Sign, you need to send an email request to
support@digi-sign.com [7] providing your (or the end users) first name, last name and email address. Digi-Sign will then send you (or to any user you requested) a Digi-Access™ invitation email message containing instructions on how to apply for a Digi-Access™ certificate and the relevant Digi-Access™ web application URL.
NOTE: If you already supplied a full list of Digi-Access™ end users to Digi-Sign, you will not be requested to send a request email to our Support Department for each of these users.
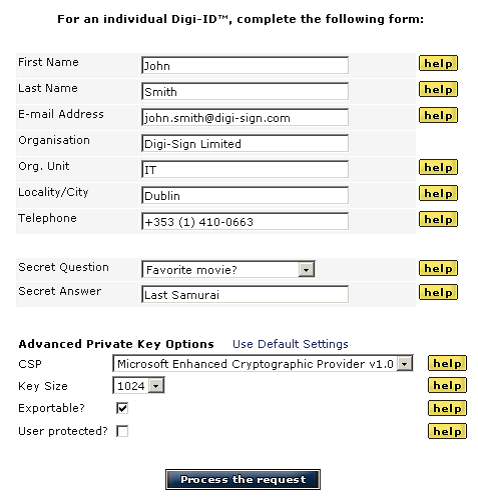
Once entered the web application form the user is asked for specific personal information that is going to be inserted into his/her certificate.
Each of the above fields has an on-line help available explaining precisely how to fill it or which option to enable.
Setting up a Digi-Access™ user requires a Windows Local or Active Directory Domain (depending on the Windows Server configuration) User account, and a Digi-Access™ [1] certificate containing the public key.
Based on the TTM™ [8] (Total Trust Management) agreement between Digi-Sign and the company which uses
Digi-Access™ facility, Digi-Sign will automatically send the user’s Digi-Access™ Certificate containing only the public key to the Digi-Access™ Administrator.
The user's Digi-Access™ Certificate file will be sent as an email attachment and should be saved on/uploaded to the Windows Server where the Digi-Access™ has been installed.
Further actions with the user's Digi-Access™ Certificate will be described later in this document in section 4.2.
Log on as a Domain Administrator to the Windows Server where Windows Active Directory is installed on and the Windows server containing the Digi-Access™ facility is connected to and:
Go to Windows Administrative Tools.
Once the Windows User Account (from section 3.1) is present, you may move to the final step of this document where you setup a Digi-Access™ user. Before you do this, make sure that you have the following items available:
Links:
[1] http://www2.digi-sign.com/digi-access
[2] http://www.digi-sign.com/downloads/certificates/dsroot/Digi-Sign_Root_CA.cer
[3] http://www.digi-sign.com/downloads/certificates/digi-access/Digi-Sign_CA_Digi-Access_Xs.cer
[4] http://www2.digi-sign.com/digital+certificate
[5] https://www.digi-sign.com/downloads/certificates/dsroot/Digi-Sign_Root_CA.cer
[6] https://www.digi-sign.com/downloads/certificates/digi-access/Digi-Sign_CA_Digi-Access_Xs.cer
[7] mailto:support@digi-sign.com
[8] http://www2.digi-sign.com/service/certificate+authority+management+services#ttm
[9] http://www.digi-sign.com