Digi-Sign, The Certificate Corporation
Published on Digi-Sign, The Certificate Corporation (http://www2.digi-sign.com)

Home > Enabling Client Authentication

By Digi-Sign
Created Aug 12 2008 - 12:10

Enabling Client Authentication

Enabling Client Certificate Authentication on IIS 5.x+ web server

To enable Client Certificate Authentication on IIS 5.x+ you will need to obtain Certification Authority [CA] Certificates, your own Digi-Access™ [1] Client Certificate and setup a local user (or Active Directory Domain) account on a Windows Server that the IIS 5.x+ web server is installed and running on.

2.1 Obtaining and installing the Digi-Access™ Certification Authority Certificates

    To obtain the Digi-Access™ Root Certification Authority Certificate, use the following URL:

    Digi-Sign Root CA [2]

To obtain the Digi-Access™ Intermediate Certification Authority Certificate, use the following URL:

Digi-Sign CA Digi-Access Xs [3]

Once you save these Certificates to the desktop (or another directory on the hard drive) of the web server machine, then:

  • Click the Start button, then select Run and type MMC (standing for Microsoft Management Console).
  • Click File and select Add/Remove Snap-in
  • Select Add, select Certificates from the Add Standalone Snap-in box and click Add.
  • Select Computer Account, then Local Computer and click Finish.
  • Close the Add Standalone Snap-in box and click OK in the Add/Remove Snap-in.
  • Return to the MMC

To install the Digi-Sign_Root_CA.cer Certificate file:
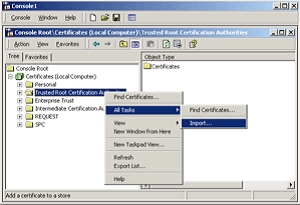
IMAGE


    - Right click the Trusted Root Certification Authorities, select All Tasks, and then select Import.

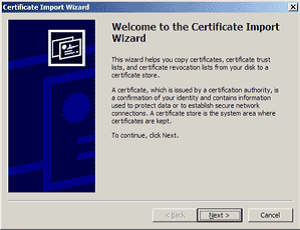
    IMAGE


    - Click Next.

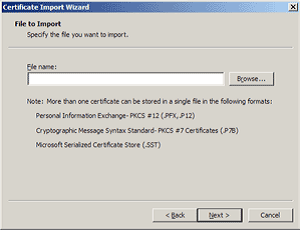
    IMAGE


    - Locate the Digi-Sign_Root_CA.cer Certificate file and click Next.

    - When the wizard is completed, click Finish.

To install the Digi-Sign_CA_Digi-Access_Xs.cer:
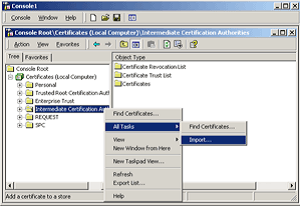
IMAGE


    - Right click the Intermediate Certification Authorities, select All Tasks, and then select Import.

    - Complete the import wizard again, but this time locating the Digi-Sign_CA_Digi-Access_Xs.cer when prompted for the Certificate file.

    - Ensure that the Digi-Sign_Root_CA.cer certificate appears under Trusted Root Certification Authorities.

    - Ensure that the Digi-Sign_CA_Digi-Access_Xs.cer appears under Intermediate Certification Authorities.


Important: You must now restart the IISAdmin service or reboot the computer to complete the installation.

2.2 Preparing IIS 5.x+ for Digi-Access™ Client Certificate Authentication

To prepare IIS 5.x+ for Digi-Access™ Client Certificate Authentication:

Go to Windows Administrative Tools.

  • Start Internet Services Manager.
  • IMAGE
  • Open the properties window for the website that you have enabled SSL on. You can do this by right clicking on the Default Website and selecting Properties from the menu.
  • Open Directory Security by right clicking on the Directory Security tab.

  • IMAGE


  • Click Edit in the Anonymous access and authentication control section.
  • An Authentication Methods window will appear.

  • IMAGE


  • Make sure that all options (check boxes) in this section are disabled, including the Anonymous Access, Basic Authentication, Digest Authentication and Integrated Windows Authentication.
  • Click OK to apply changes.
  • Click Edit in Secure communications section.
  • A Secure Communications window will appear.

  • IMAGE


  • Ensure that Require secure channel (SSL) option is enabled. Require 128-bit encryption option should be disabled. You may enable it if you are sure that all end users connecting to your Digi-Access™ protected web site will have 128-bit enabled browsers.
  • Ensure that Enable client certificate [4] mapping option is enabled.
  • Ensure that Enable certificate trust list option is enabled.
  • Under Current CTL, click New.
  • Click Next.
  • A Certificate Trust List Wizard window will appear.

  • IMAGE


  • Click Add from file.
  • Browse for the Digi-Sign_Root_CA.cer Certificate file that you downloaded and saved on/uploaded to the server in section 2.1 of this document.
  • Once located, select the file and click Open.
  • Click Next.

  • IMAGE


  • Type Friendly Name, for example: Digi-Access.
  • Type Description, for example: Digi-Access Client Authentication for my system.
  • Click Next.
  • Click Finish.
  • You should now see your CTL List on the Secure Communications window.

  • IMAGE


  • Click OK and then OK again.

Your IIS 5.x+ web server is now ready to start working with Digi-Access™ Client Certificate Authentication.

  • IIS Implementation Guide

Source URL: http://www2.digi-sign.com/support/digi-access/iis-section2

Links:
[1] http://www2.digi-sign.com/digi-access
[2] https://www.digi-sign.com/downloads/certificates/dsroot/Digi-Sign_Root_CA.cer
[3] https://www.digi-sign.com/downloads/certificates/digi-access/Digi-Sign_CA_Digi-Access_Xs.cer
[4] http://www2.digi-sign.com/digital+certificate