
Using Digi-ID™ [1] with Microsoft® is simple because MS Word & Excel, Outlook [2] & Outlook Express [2] are all x.509 compliant and this means they work seamlessly with Digi-ID™ [3], ‘out of the box’.
Note that Digital Signature facility is available only for Microsoft Office Xp [2002] or higher. Sign a Document Using the Built-in Feature.
NOTE: If you haven't yet saved the document that you want to digitally sign, at this point you will be asked to save it. You won't be able to proceed with the signing until you've saved it.

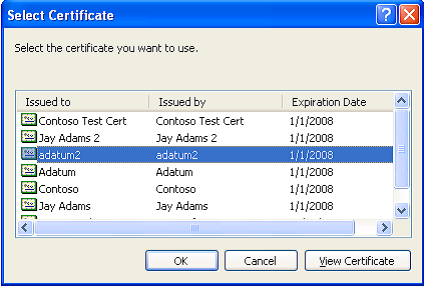
Figure 3. Selecting a digital certificate for signing.
6. Click OK to close each of the dialog boxes.
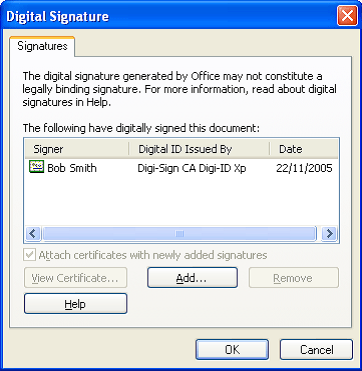
Now the document is digitally signed. How would you know? If you look at the name of the document on the top left of the document window, you will find "(Signed)" next to the document name.
Multiple Digital Signatures
NOTE that you can also use more than one digital certificate to sign a document. If you want to do this, repeat step 5 the same number of times as the number of digital certificates used, before continuing to step 6.
Using Digi-ID™ [3] with Microsoft® is simple because MD Word & Excel, Outlook [2] & Outlook Express [2] are all x.509 compliant and this means they work seamlessly with Digi-ID™ [3], ‘out of the box’.
Note that Digital Signature facility is available only for Microsoft Office Xp [2002] or higher. Sign a Document Using the Built-in Feature. And you can also use the Digi-Seal™ [4] system to sign documents too.
NOTE: If you haven't yet saved the document that you want to digitally sign, at this point you will be asked to save it. You won't be able to proceed with the signing until you've saved it.

Figure 3. Selecting a digital certificate for signing.
6. Click OK to close each of the dialog boxes.
Now the document is digitally signed. How would you know? If you look at the name of the document on the top left of the document window, you will find "(Signed)" next to the document name.
Multiple Digital Signatures
NOTE that you can also use more than one digital certificate to sign a document. If you want to do this, repeat step 5 the same number of times as the number of digital certificates used, before continuing to step 6.
NOTE that Digital Signature facility is available only for Microsoft Office Xp [2002] or higher. And you can also use the Digi-Seal™ [4] system to sign documents too.
Open the document that you want to check


NOTE that Digital Signature facility is available only for Microsoft Office Xp [2002] or higher. And you can also use the Digi-Seal™ [4] system to sign documents too.
Open the document that you want to check


NOTE that Digital Signature facility is available only for Microsoft Office Xp [2002] or higher. Sign a Document Using the Built-in Feature. And you can also use the Digi-Seal™ [4] system to sign documents too.
NOTE If you haven't yet saved the document that you want to digitally sign, at this point you will be asked to save it. You won't be able to proceed with the signing until you've saved it.

Figure 3. Selecting a digital certificate for signing.
6. Click OK to close each of the dialog boxes.
Now the document is digitally signed. How would you know? If you look at the name of the document on the top left of the document window, you will find "(Signed)" next to the document name.
Multiple Digital Signatures
NOTE that you can also use more than one digital certificate to sign a document. If you want to do this, repeat step 5 the same number of times as the number of digital certificates used, before continuing to step 6.
Links:
[1] http://www2.digi-sign.com/digi-seal
[2] http://www2.digi-sign.com/support/digi-mail
[3] http://www2.digi-sign.com/digi-id
[4] http://www2.digi-sign.com/en/digi-seal
[5] http://www2.digi-sign.com/digital+certificate