Digi-ID™
Exporting Client Certificate from Mozilla Firefox
On the original PC, where the Client Certificate is currently installed on:
- Launch Firefox web browser
- Click the Tools menu, then select Options
- Switch to Advanced tab
- Click the View Certificates
- Switch to Your Certificates tab
- Select the Certificate you intend to export
- Click the Backup button
- Type a file name and choose a path that the certificate will be exported to and click Save
Importing Client Certificate into Mozilla Firefox
To import a certificate along with the associated private key from a PKCS#12 file (.pfx/.p12) into your Mozilla Firefox web browser:
- Launch Mozilla Firefox web browser
- Open Tools
- Select Options
- Switch to Advanced tab
- Click the View Certificates button
- Switch to Your Certificates tab
- Click the Import button
- Locate the '.pfx/.p12' file you transported/exported, select it and click Open
Digi-Access™ Support
This is the main Digi-Access™ Support page and provides all the main support pages you require to configure, own, deploy, manage and maintain your Digi-Access™ Certificates and the systems that use them.Exporting Client Certificate from Windows Certificate Store
On the original PC, where the BITS Digi-ID™ is currently installed, follow these steps:
- Open Microsoft Internet Explorer Browser
- Click the 'Tools' menu, then select 'Internet Options'
- Switch to 'Contents' tab
- Click the 'Certificates' button
- Switch to 'Personal' tab and select the BITS Digi-ID™ you need to export
- Click the 'Export' button
- Click the 'Next' button when the export wizard appears
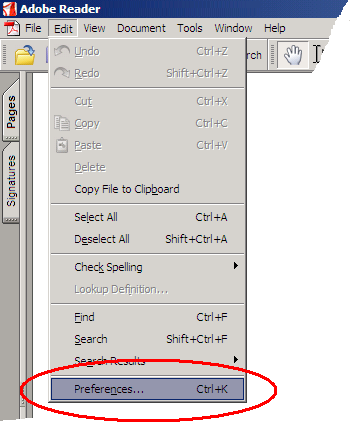
1. Open your Adobe Acrobat Reader® and select Edit > Preferences

2. Select 'Security' in the categories list
3. Click the Advance preferences button beside this, on the same interface
4. In the next pop up dialog, select the Window Integration Tab
5. Puct a check in all three of the boxes on the the Window Integration Tab dialog
Importing Client Certificate into Windows Certificate Store
On the PC, where you intend to import/install the Client Certificate from a previously exported 'Personal Information Exchange - PKCS#12(.pfx)' file:
- Locate the '.pfx' file you transported/exported and double click it.
- A new certificate import wizard will appear, click the 'Next' button twice.
- Enter the password you created while exporting the certificate.
- Select 'Mark the private key as exportable'.
- Click 'Next' twice
- Click 'Finish'.
Exporting Client Certificate from Windows Certificate Store
On the original PC, where the Client Certificate is currently installed on:
- Open Microsoft Internet Explorer Browser
- Click the 'Tools' menu, then select 'Internet Options'
- Switch to 'Contents' tab
- Click the 'Certificates' button
- Switch to 'Personal' tab and select the Client Certificate you would like to export
- Click the 'Export' button
- Click the 'Next' button when the export wizard appears


