This is the main Digi-Mail™ Support page and provides all the main support pages you require to configure, own, deploy, manage and maintain your Digi-Mail™ Certificates and the systems that use them.
You can browse this Support Directory or you can view the Digi-Mail™ KnowledgeBase [1] that contains specific Questions & Answers [Q&A] (this is free today but will be a 'Subscription Only' service soon).
Alternatively, you may wish to search all of the Digi-Mail™ pages using the search facility below.

The Digi-CA™ [4] Certificate Authority [CA] system (that issues the Digi-Mail™ end user certificates) can issue thousands of certificates every hour. This 'endless' capacity means that getting Digi-Mail™ certificates to the end users can occur as quickly as your environment demands.
How the Digi-Mail™ certificates are issued is set by the 'Enrolment Policy [5]'. The options within the Enrolment Policy are designed to be very flexible. They can be customised to meet almost any requirement with many different settings and combinations. The three basic options are:
Issuing the Digi-Mail™ certificates is either a one or two stage process. Either the user receives an email inviting them to apply for their certificate, or they are referred from an existing online site/system to the Certificate Application form.
However the user is prompted to get their certificate, in the first stage, the Digi-CA™ Inviting 'action' requires the end user 'reaction' (completing an application form). In the second stage, the Digi-CA™ Approving 'action' requires the end user 'reaction' (activating the certificate) and this completes the process. It is best understood as follows:
As stated, because the Enrolment Policy is very flexible, there are many different ways to invite and approve end users certificates. The following is a sample issuing process only. You may wish to include other options, as required.
Stage One 'Digi-CA™ Action' - Inviting Digi-Mail™ Certificate Applications
Using the Digi-CA™ RA Management Console interface, the Administrator uploads a .CSV batch file inviting [6] as many users as required.

Stage One 'User Reaction' - Completing Enrolment Form
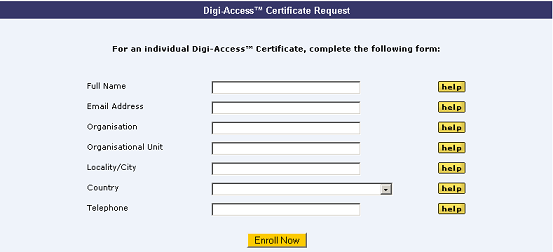
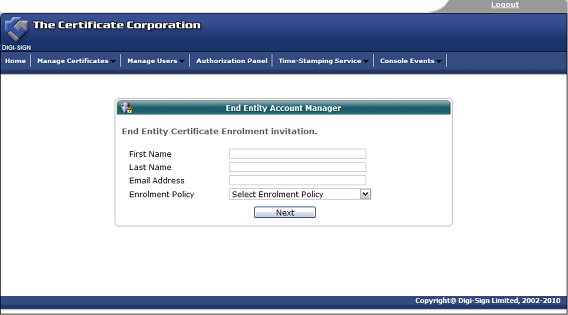
The Digi-CA™ system sends an email to each end user with a unique link to the Digi-Mail™ certificate enrolment form. Using the link provided in the email, the end user then completes the Digi-Mail™ certificate enrolment form.
Note:- this is the default Digi-Mail™ End Entity Certificate Enrolment Form. This form uses basic HTML programming that can be altered [7] to match your specific design requirements.

Once the end user completes all the fields and submits the enrolment form to the Digi-CA™ system, the Administrator is notified. The Administrator then approves [5] each end user application using the Digi-Mail™ Certificate Authorization Panel.
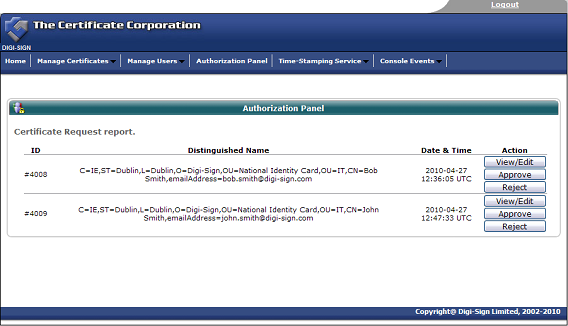
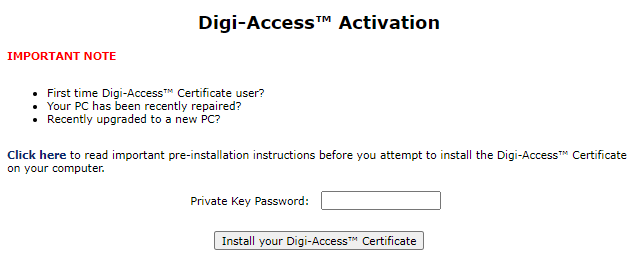
Stage Two 'User Reaction' - Activating the Digi-Mail™ Certificate
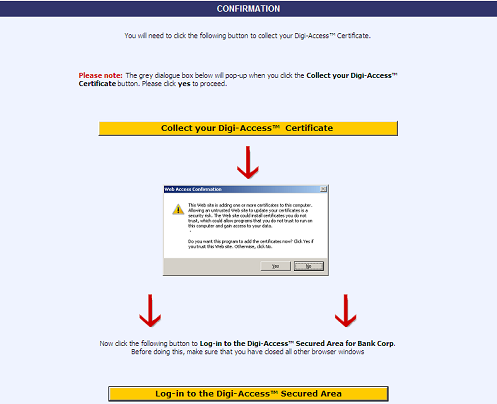
Assuming the Administrator approves the application, the Digi-CA™ system sends a new email to the end user advising them that their application has been approved. Using the link provided in the email, the end user then activates [8] the Digi-Mail™ certificate and this completes the issuing process.
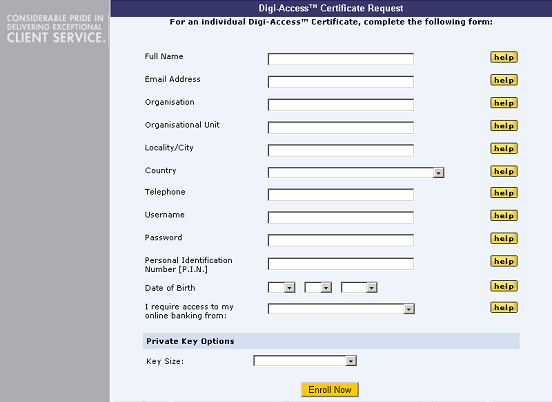
The Digi-Mail™ End Entity Digital Certificate Enrolment Form uses basic HTML programming that can be altered to match your specific design requirements. Below are some samples of customised enrolment pages:
Once the enrolment form is completed and submitted by the end user, the Enrolment Policy enforces how the application is handled by the Digi-CA™ system. Learn more about the Enrolment Policy [5] options or browse the other pages below.
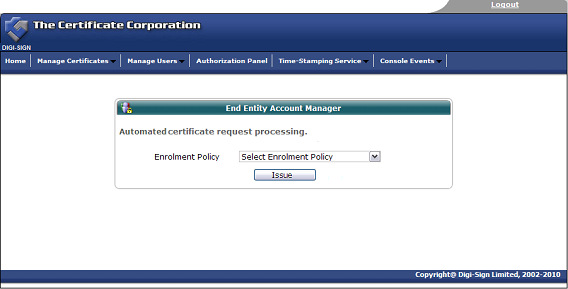
Digi-Mail™ certificates are issued according to the Enrolment Policy. The first stage is the Inviting stage that is controlled by the End Entity Account Manager interface in Digi-CA™. There are three options:
Once the invitation is issued, the end user must complete the enrolment form. View customised enrolment [7] forms or browse the other pages below.
The Enrolment Policy for Digi-Mail™ controls the entire certificate issuing process. Enrolment Policy is set by the Certificate Policy [CP] for the Digi-CA™. This is a specialist subject and requires experienced knowledge of Certificate Authority [CA] systems and Public Key Infrastructure [PKI]. Keeping this complex topic simple, there are three basic options for Enrolment Policy:
The Digi-Mail™ End Entity Digital Certificate Enrolment Form uses basic HTML programming that can be altered to match your specific design requirements. Below are some samples of customised enrolment pages:

Once the enrolment form is completed and submitted by the end user, the Enrolment Policy enforces how the application is handled by the Digi-CA™ system. Learn more about the Enrolment Policy [5] options or browse the other pages below.

5. Enter a name for your security setting into the Security Settings Name box
6. Ensure S/MIME is selected on the Secure Message Format box

7. Check the Default Security Setting for this Secure Message Format
8. In Certificates and Algorithms section click the Choose button in the Signing Certificate section
9. Select your Secure Email Certificate from the Select Certificate dialog box
10. Outlook should automatically choose the same Secure Email Certificate as your Signing Certificate for the Encryption Certificate.
If not, click the Choose button in the Encryption Certificate and select your Secure Email Certificate from the Select Certificate dialog box
11. Ensure Send These Certificates with Signed Messages is selected
12. Click OK to return to Options dialog box
13. Click OK to return to Outlook
Signing an email ensures the recipient knows the email has come from you and informs him / her if it has been tampered with since being signed.
2. Click Sign button

3. Click Send button
The recipient of your email must have a copy of your Certificate in order to verify your signed email is legitimate. Ensure you have completed Step 11 in the Assigning your Certificate to your email account section above.
Encrypting an email ensures that only the recipient may view the email content and any attachments. Note: in order to encrypt an email for the recipient you must have the recipient's digital certificate, and their digital certificate must be assigned to the relevant entry in your address book

4. Click Send button
Firstly you will need to collect the email certificate from our system using Internet Explorer.
The first step in using S/MIME is to get a digital certificate or digital identification. A digital identification is a public/private key pair, a name, and a certificate that attests to the validity of the public key for this name. At Digi-Sign we refer to this complete package as a Digi-ID™.
For security reasons, you must follow the online instructions carefully. Do exactly as instructed and ensure all operations are carried out from the same computer for each user.
Domino R5 handles MIME (and therefore S/MIME) message content natively. There is nothing you have to do to enable S/MIME messages to pass through a Domino server.
If you are using all-Microsoft software and acquire a Digi-ID™ on that computer, your private key and public key certificate are automatically installed correctly. They become integrated with Internet Explorer and Outlook/Outlook Express and are automatically saved to the Microsoft Certificate Store. After acquiring the Digi-ID™, you can easily see it:
To use your Digi-ID™, just press the buttons for Sign (authenticate), or Encrypt (secret), or both, when composing an e-mail message. When you receive a signed message, you will see a symbol indicating this, near where the paperclip appears for attachments.
If you are using Netscape Messenger, Groupwise, or other e-mail software, the details for installing and using the Digi-ID™ may vary, but the general principles are the same. Visit Digi-Sign Support and look for the instructions Digi-ID™ / Digi-Mail™ Help.
For these instructions, I assume you already have installed a Digi-ID™ [10] on a Windows computer using Internet Explorer and want to use that Digi-ID™ with Lotus Notes on the same computer.
There are four general steps:
This is simpler than it sounds, since the first three steps only have to be done once.
If your situation is different- exporting on a non-Windows computer for example - the basic idea is still the same.

4. Click the Export button.
5. Click the Next button in the export wizard.
6. Select Yes to export the private key.
7. Select PKCS #12 as the export file format. Also select "Include all certificates" and "Enable strong protection" on this page.
8. Click the Next button and enter a password for the export file that will be created. Choose a good password, since the export file will contain your private key.
9. Enter a file name for the export file in the File name text field when requested. Something like c:\temp\mycert works fine. The .PFX extension will be added automatically.
10. Click the Next button and then confirm your choices by clicking the Finish button.
11. Click OK if you see a warning that your private key is being used.
Certificate for Internet mail from Notes:
To use the Digi-ID™ [10] as you send and receive e-mail from Notes:
Keep in mind that to send an encrypted e-mail to someone who is not using Notes mail, you must have that person's public key certificate in your Domino Directory. The certificate, if present, is visible on the Certificates tab of the recipient's Person document under Internet Certificates. To get more detail about a particular certificate in a Person document:
If you want to send an encrypted message to someone using S/MIME and their Internet certificate is in their Person document in a Domino Directory to which you have access, no special steps are required. If you want to send an encrypted message to someone and you do not have their Internet certificate, ask that person to send you a signed e-mail message.
When you open the signed message, you will be prompted to cross certify. If you wish to establish trust with the certificate authority that issued their certificate in one simple step (in addition to trusting the user's certificate), you may select it from the Subject name list box. Confirmation that the message was signed will appear in the status bar. Then choose Tools - Add Sender to Address Book from the menu. The default action (on the Advanced tab) is to "Include x.509 certificates when encountered." When a Contact document is added to your personal address book, the sender's public key will be available to you and you will be able to encrypt messages to him or her.
The first step in using S/MIME is to get a digital certificate or digital identification. A digital identification is a public/private key pair, a name, and a certificate that attests to the validity of the public key for this name. At Digi-Sign we refer to this complete package as a Digi-ID™.
For security reasons, you must follow the online instructions carefully. Do exactly as instructed and ensure all operations are carried out from the same computer for each user.
Domino R6 handles MIME (and therefore S/MIME) message content natively. There is nothing you have to do to enable S/MIME messages to pass through a Domino server.
If you are using all-Microsoft software and acquire a Digi-ID™ on that computer, your private key and public key certificate are automatically installed correctly. They become integrated with Internet Explorer and Outlook/Outlook Express and are automatically saved to the Microsoft Certificate Store. After acquiring the Digi-ID™, you can easily see it:
To use your Digi-ID™, just press the buttons for Sign (authenticate), or Encrypt (secret), or both, when composing an e-mail message. When you receive a signed message, you will see a symbol indicating this, near where the paperclip appears for attachments.
If you are using Netscape Messenger, Groupwise, or other e-mail software, the details for installing and using the Digi-ID™ may vary, but the general principles are the same. Visit Digi-Sign Support and look for the instructions Digi-ID™ / Digi-Mail™ Help.
For these instructions, I assume you already have installed a Digi-ID™ on a Windows computer using Internet Explorer and want to use that Digi-ID™ with Lotus Notes on the same computer. There are four general steps:
This is simpler than it sounds, since the first three steps only have to be done once.
If your situation is different- exporting on a non-Windows computer for example - the basic idea is still the same.
To import the Digi-ID™ to your Notes ID file:
If you have an Internet certificate that you have stored in a browser, such as Netscape, and you want to use that certificate in the Notes browser, you need to import the Internet certificate into your User ID.
You cannot import invalid Internet certificates or incomplete certificate chains.
2. Choose File - Security - User Security.
Macintosh OS X users: Notes - Security - User Security.
3. Click Your Identity - Your Certificates.
4. Click Get Certificates - Import Internet Certificates on the right side of the dialog box.
5. Select the file containing the Internet certificate that you just exported from the browser in the "Specify File Containing the Internet Certificates" dialog box, and then click Open.
6. If prompted, select the format of the Internet certificate you are importing, and then click Continue. By default, Notes should select the correct format for you.
7. If there is a password you set for the file, enter the password.
8. To accept the import, click the "Accept All" button in the "Import Internet Certificates" dialog box.
9. Check that your Internet certificates were imported into your User ID by choosing File - Security - User Security (Macintosh OS X users: Notes - Security - User Security), click Your Identity - Your Certificates, and then select "Your Internet Certificates" from the drop-down list.
10. (Recommended) Make a backup copy of your User ID after you successfully import an Internet certificate (unless you are a roaming user with the specific configuration that does not require a backup User ID).
NOTE: Once you import the Internet certificate into your User ID, you may need to create a cross certificate if you do not already trust the Internet certificate.
Links:
[1] http://www2.digi-sign.com/en/support/knowledgebase/digi-mail
[2] http://www2.digi-sign.com/user/login
[3] http://www2.digi-sign.com/user/register
[4] http://www2.digi-sign.com/digi-ca
[5] http://www2.digi-sign.com/digi-mail/distribute/policy
[6] http://www2.digi-sign.com/digi-mail/distribute/invite
[7] http://www2.digi-sign.com/digi-mail/distribute/enrol
[8] http://www2.digi-sign.com/digi-mail/distribute/activate
[9] http://www2.digi-sign.com/digital+certificate
[10] http://www2.digi-sign.com/digi-id