This is the main Digi-CA™ Service Support page and provides all the main support pages you require to administer your Digi-CA™ Service system.
You can browse this Support Directory or you can view the Digi-CA™ KnowledgeBase [1] that contains specific Questions & Answers [Q&A](this is free today but will be a 'Subscription Only' service soon).
Alternatively, you may wish to search all of the Digi-CA™ pages using the search facility below.

The Digi-CA™ [4] Certificate Authority [CA] system (that issues the Digi-ID™ end user digital signatures) can issue thousands of digital signatures every hour. This 'endless' capacity means that getting Digi-ID™ digital signatures to the end users can occur as quickly as your environment demands.
How the Digi-ID™ digital signatures are issued is set by the 'Enrolment Policy [5]'. The options within the Enrolment Policy are designed to be very flexible. They can be customised to meet almost any requirement with many different settings and combinations. The three basic options are:
Issuing the Digi-ID™ digital signatures is either a one or two stage process. Either the user receives an email inviting them to apply for their digital signature, or they are referred from an existing online site/system to the Digital Signature Application form.
However the user is prompted to get their digital signature, in the first stage, the Digi-CA™ Inviting 'action' requires the end user 'reaction' (completing an application form). In the second stage, the Digi-CA™ Approving 'action' requires the end user 'reaction' (activating the digital signature) and this completes the process. It is best understood as follows:
As stated, because the Enrolment Policy is very flexible, there are many different ways to invite and approve end users digital signatures. The following is a sample issuing process only. You may wish to include other options, as required.
Stage One 'Digi-CA™ Action' - Inviting Digi-ID™ Digital Signature Applications
Using the Digi-CA™ RA Management Console interface, the Administrator uploads a .CSV batch file inviting [6] as many users as required.

Stage One 'User Reaction' - Completing Enrolment Form
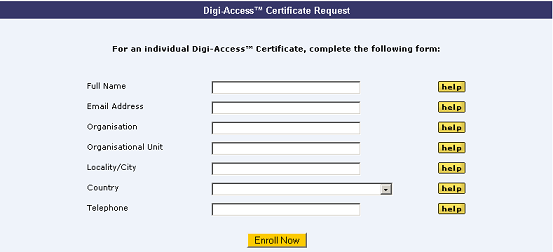
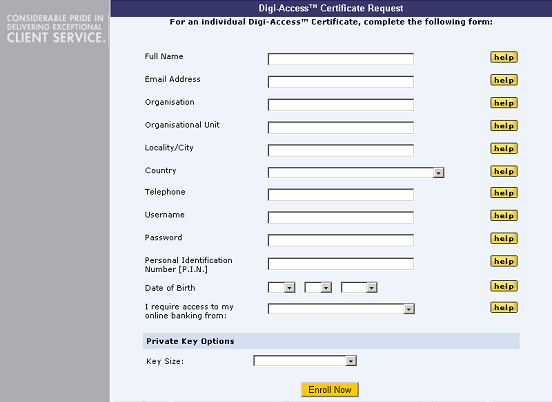
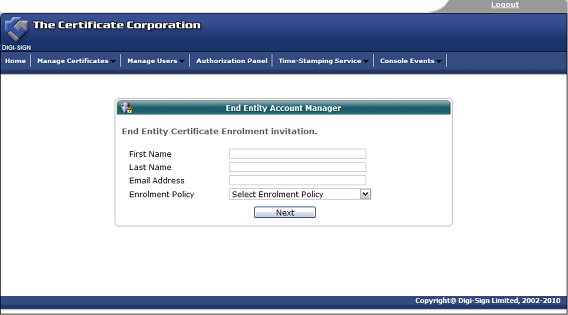
The Digi-CA™ system sends an email to each end user with a unique link to the Digi-ID™ digital signature enrolment form. Using the link provided in the email, the end user then completes the Digi-ID™ digital signature enrolment form.
Note:- this is the default Digi-ID™ End Entity Digital Signature Enrolment Form. This form uses basic HTML programming that can be altered [7] to match your specific design requirements.

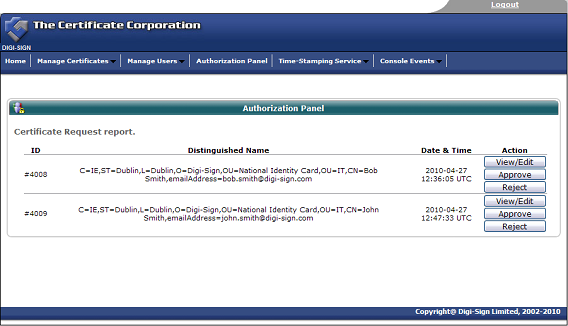
Once the end user completes all the fields and submits the enrolment form to the Digi-CA™ system, the Administrator is notified. The Administrator then approves [5] each end user application using the Digi-ID™ Digital Signature Authorization Panel.
Stage Two 'User Reaction' - Activating the Digi-ID™ Digital Signature
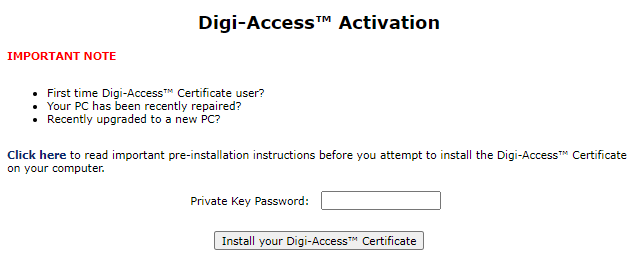
Assuming the Administrator approves the application, the Digi-CA™ system sends a new email to the end user advising them that their application has been approved. Using the link provided in the email, the end user then activates [8] the Digi-ID™ digital signature and this completes the issuing process.
Once the enrolment form is completed and submitted by the end user, the Enrolment Policy enforces how the application is handled by the Digi-CA™ system. Learn more about the Enrolment Policy [5] options or browse the other pages below.
Once the invitation is issued, the end user must complete the enrolment form. View customised enrolment [7] forms or browse the other pages below.
The Enrolment Policy for Digi-ID™ controls the entire certificate issuing process. Enrolment Policy is set by the Certificate Policy [CP] for the Digi-CA™. This is a specialist subject and requires experienced knowledge of Certificate Authority [CA] systems and Public Key Infrastructure [PKI]. Keeping this complex topic simple, there are three basic options for Enrolment Policy:

Once the enrolment form is completed and submitted by the end user, the Enrolment Policy enforces how the application is handled by the Digi-CA™ system. Learn more about the Enrolment Policy [5] options or browse the other pages below.
You don’t need a pen to sign an electronic document. Security features in Digi-Seal™ [9] and Adobe® Acrobat® 7+ let you sign documents, whether to simply show approval or to control access and modifications to the documents you distribute.
To digitally sign a document, you design the appearance of your signature, decide where you’re going to sign, and obtain or create a digital ID, which allows others to validate your signature.
To limit access to a document, you must have digital IDs for the people you want to give access to.

Choose Edit > Preferences (Windows) or Acrobat > Preferences (Mac OS), and then choose Security. Click New in the Digital Signatures section of the panel to create a new signature appearance. Choose the items that you want to appear with your signature, including the date when you signed, the reason that you signed, the Acrobat logo, and other information. The preview changes as you make your selections. If you want to include a graphic, select Imported Graphic, and then click File and select the PDF file that you want to include. Give the signature appearance a title, and then click OK.
You can create multiple signature appearances, each for a different purpose. For example, you may want to use one signature appearance for signing contracts and a different signature appearance for signing correspondence.

2. Choose to sign the document.
In Acrobat, open the PDF file that you want to sign. Choose Document > Digital Signatures > Sign This Document. If the document has not been certified, Acrobat displays an alert dialog box. Click Continue Signing to sign the document.
You may also choose to certify the document. When you certify a document, you attest to its contents and specify what changes may be made to the document. If other changes are made after you sign, the document becomes uncertified.

3. Select the signature field.
If a signature field already exists on the document, choose Sign an Existing Signature Field. When you click OK, Acrobat scrolls to the signature field; click the signature field with the Hand tool to select it.
If no signature field exists, choose Create A New Signature Field To Sign. Acrobat displays an information screen; when you click OK, you can draw the signature field on the page.
Alternatively, you can create an invisible signature. Invisible signatures do not appear on the page in the document pane; they are visible only on the Signatures tab.

4. Select a digital ID.
Select or obtain a digital ID created by another company. Alternatively, you can create a self-signed digital ID.
A digital ID contains information in a certificate, which can be shared with others and is used by them to validate your signature. Third-party digital IDs can be verified by other companies and are therefore more secure than
self-signed digital IDs.

5. Apply the signature.
Enter any additional information, such as your location or your reason for signing, and then sign and save the document.
You must save the document in order to sign it. Choose Sign and Save to save the document with its original name. Choose Sign And Save As to save the document with a different name.

6. Obtain other digital ID files.
If you want to restrict access to the PDF file, then you need digital ID files for the people who require access. Choose Advanced > Manage Digital IDs > Trusted Identities, and then click Request Contact. Type your name and e-mail address, and click Next. To send an e-mail message, type the e-mail address, edit the message, and click Send. If necessary, finish the e-mail message in your e-mail client application. When you receive the digital ID file, open the attachment, choose Set Contact Trust, and then click Import.
Once you have added someone’s digital ID to your trusted identities, it remains there until you delete it. You can use it to validate that person’s signature or to provide access rights to PDF files in the future.

7. Set access rights.
Choose Document > Security > Show Security Settings For This Document. From the Security Method menu, choose Certificate Security. Choose which document components you want to encrypt and click Next. Select a digital ID for yourself so that you can open the document later. Then select the digital IDs for the people to whom you want to grant access. Select each digital ID and click Permissions to set restrictions on printing or making changes for that individual. Click Next. Review the settings; if you want to change any, click Back. Otherwise, click Finish. Save the file to preserve the security settings.
When you encrypt a PDF file, you restrict access to the document to a specific list of recipients. You can also restrict the recipients’ ability to edit, copy, or print the file.

Note that you can also use more than one digital certificate to sign a document. If you want to do this, repeat steps from 2 to 5 the same number of times as the number of digital certificates used.
1. Open your Adobe Acrobat Reader® and select Edit > Preferences

2. Select 'Security' in the categories list
3. Click the Advance preferences button beside this, on the same interface
4. In the next pop up dialog, select the Window Integration Tab
5. Puct a check in all three of the boxes on the the Window Integration Tab dialog

A .pdf that has been signed and not tampered with
When the .pdf document is opened the following message automatically appears:

When the signature is checked for this document the following popup dialog appears:

A .pdf that has been signed and but has been tampered with after signing
When the .pdf document is opened the following message automatically appears:

When the signature is checked for this document the following popup dialog appears:

1. Before you start, ensure your Adobe Acrobat Reader® is correctly configured [10]
2. Open the document that you want to check.
3. Click the Sign > Validate All Signatures in Document

4. Wait until signature validation is finished.

5. Ensure you have the Signatures Navigation tab enabled

6. Click on the Signatures tab to view a list of all Digital Certificates [11] applied to the document along with the relevant dates they were added on.

Using Digi-ID™ [12] with Microsoft® is simple because MS Word & Excel, Outlook [13] & Outlook Express [13] are all x.509 compliant and this means they work seamlessly with Digi-ID™ [14], ‘out of the box’.
Note that Digital Signature facility is available only for Microsoft Office Xp [2002] or higher. Sign a Document Using the Built-in Feature.
NOTE: If you haven't yet saved the document that you want to digitally sign, at this point you will be asked to save it. You won't be able to proceed with the signing until you've saved it.

Figure 3. Selecting a digital certificate for signing.
6. Click OK to close each of the dialog boxes.
Now the document is digitally signed. How would you know? If you look at the name of the document on the top left of the document window, you will find "(Signed)" next to the document name.
Multiple Digital Signatures
NOTE that you can also use more than one digital certificate to sign a document. If you want to do this, repeat step 5 the same number of times as the number of digital certificates used, before continuing to step 6.
Using Digi-ID™ [14] with Microsoft® is simple because MD Word & Excel, Outlook [13] & Outlook Express [13] are all x.509 compliant and this means they work seamlessly with Digi-ID™ [14], ‘out of the box’.
Note that Digital Signature facility is available only for Microsoft Office Xp [2002] or higher. Sign a Document Using the Built-in Feature. And you can also use the Digi-Seal™ [9] system to sign documents too.
NOTE: If you haven't yet saved the document that you want to digitally sign, at this point you will be asked to save it. You won't be able to proceed with the signing until you've saved it.
Figure 3. Selecting a digital certificate for signing.
6. Click OK to close each of the dialog boxes.
Now the document is digitally signed. How would you know? If you look at the name of the document on the top left of the document window, you will find "(Signed)" next to the document name.
Multiple Digital Signatures
NOTE that you can also use more than one digital certificate to sign a document. If you want to do this, repeat step 5 the same number of times as the number of digital certificates used, before continuing to step 6.
NOTE that Digital Signature facility is available only for Microsoft Office Xp [2002] or higher. And you can also use the Digi-Seal™ [9] system to sign documents too.
Open the document that you want to check

NOTE that Digital Signature facility is available only for Microsoft Office Xp [2002] or higher. And you can also use the Digi-Seal™ [9] system to sign documents too.
Open the document that you want to check
NOTE that Digital Signature facility is available only for Microsoft Office Xp [2002] or higher. Sign a Document Using the Built-in Feature. And you can also use the Digi-Seal™ [9] system to sign documents too.
NOTE If you haven't yet saved the document that you want to digitally sign, at this point you will be asked to save it. You won't be able to proceed with the signing until you've saved it.
Figure 3. Selecting a digital certificate for signing.
6. Click OK to close each of the dialog boxes.
Now the document is digitally signed. How would you know? If you look at the name of the document on the top left of the document window, you will find "(Signed)" next to the document name.
Multiple Digital Signatures
NOTE that you can also use more than one digital certificate to sign a document. If you want to do this, repeat step 5 the same number of times as the number of digital certificates used, before continuing to step 6.

|
Microsoft® Internet Explorer® |
Mozilla/Firefox/Safari |
|
1. To view your Digi-ID™ digital signature in Microsoft® Internet Explorer®, use the Tools menu (you may have to press the 'Alt' button on your keyboard to view this menu) and then select Internet Options 2. In the Internet Options dialog box, select the Content tab and then click the Certificates button 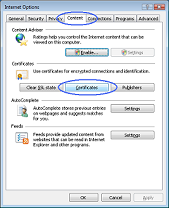 3. In the Certificates dialog box, select the certificate/digital signature you wish to examine and then click the View button 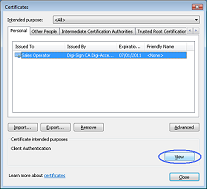 4. The chosen digital signature will be displayed where you will be able to see:
 |
1. To view your Digi-ID™ digital signature in Mozilla, Firefox or Safari, use the Tools menu and then select Options 2. In the Options dialog box, select the Encryption tab and then click the View Certificates button 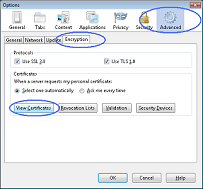 3. In the Certificate Manager dialog box, select the certificate/digital signature you wish to examine and then click the View button  4. The chosen digital signature will be displayed where you will be able to see:
 |

Exporting Client Certificate from Mozilla Firefox
On the original PC, where the Client Certificate is currently installed on:
Exporting Client Certificate from Windows Certificate Store
On the original PC, where the Client Certificate is currently installed on:
Importing Client Certificate into Mozilla Firefox
To import a certificate along with the associated private key from a PKCS#12 file (.pfx/.p12) into your Mozilla Firefox web browser:
Importing Client Certificate into Windows Certificate Store
On the PC, where you intend to import/install the Client Certificate from a previously exported 'Personal Information Exchange - PKCS#12(.pfx)' file:
|
Microsoft® Internet Explorer® |
Mozilla Firefox |
|
|
1. To view your Digi-ID™ digital signature in Microsoft® Internet Explorer®, use the Tools menu (you may have to press the 'Alt' button on your keyboard to view this menu) and then select Internet Options 2. In the Internet Options dialog box, select the Content tab and then click the Certificates button 3. In the Certificates dialog box, select the certificate/digital signature you wish to examine and then click the View button 4. The chosen digital signature will be displayed where you will be able to see:
5. Once you have viewed and confirmed this is the Digi-ID™ digital signature you wish to remove, return to the Certificates dialog box, select the certificate/digital signature and click the Remove button |
1. To view your Digi-ID™ digital signature in Mozilla Firefox, use the Tools menu and then select Options 2. In the Options dialog box, select the Encryption tab and then click the View Certificates button 3. In the Certificate Manager dialog box, select the certificate/digital signature you wish to examine and then click the View button 4. The chosen certificate/digital signature will be displayed where you will be able to see:
5. Once you have viewed and confirmed this is the Digi-ID™ digital signature you wish to delete, return to the Certificate Manager dialog box, select the digital signature and click the Delete button |
Once the Digi-ID™ certificate credits are assigned to your Digi-CA™ Service account, you may login to the system and follow the steps below to initiate the Digi-ID™ certificate application process (to issue the certificates one-at-a-time):
The above sequence will initiate an invitation email message to be sent to the email address you specify.
Note If you intend to use the Digi-ID™ certificates for server digital signing, we recommend that you enter some "friendly" email address in the relevant email address field, for example docs@yourdomain.com [15] or an alternative email address that will be easily associated with server digital signing in your organisation.
Furthermore, this email address needs to be in operation and you need to have access to email messages delivered to this email address to complete the certificate enrolment and installation process.
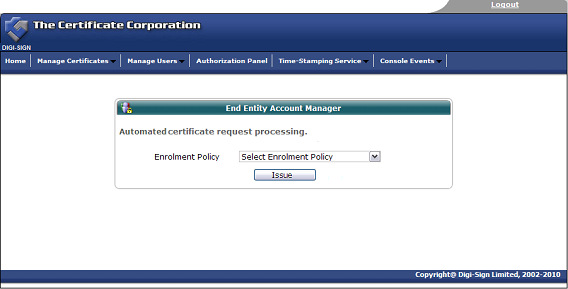
Once you have enrolled for the certificate, you can approve the application through your service account by following the steps below:
Your approval will initiate the certificate issuance process and will result in a Digi-ID™ certificate activation email being sent to the email address you entered during the certificate enrolment phase.
Once you have installed your certificate, you may export it by following the instructions [16] and later import into the server document signing application.
Links:
[1] http://www2.digi-sign.com/en/support/knowledgebase/digi-ca
[2] http://www2.digi-sign.com/user/login
[3] http://www2.digi-sign.com/user/register
[4] http://www2.digi-sign.com/digi-ca
[5] http://www2.digi-sign.com/digi-id/distribute/policy
[6] http://www2.digi-sign.com/digi-id/distribute/invite
[7] http://www2.digi-sign.com/digi-id/distribute/enrol
[8] http://www2.digi-sign.com/digi-id/distribute/activate
[9] http://www2.digi-sign.com/en/digi-seal
[10] http://www2.digi-sign.com/support/digi-id/adobe
[11] http://www2.digi-sign.com/digital+certificate
[12] http://www2.digi-sign.com/digi-seal
[13] http://www2.digi-sign.com/support/digi-mail
[14] http://www2.digi-sign.com/digi-id
[15] mailto:docs@yourdomain.com
[16] http://www2.digi-sign.com/support/client+certificates/export+windows