This is the main Digi-Access™ Help page for end users and provides all the support pages you require to own and use your Digi-Access™ two factor authentication certificates. For Administrator help and instructions, view the Digi-Access™ Administrator [1] support section.
You can return to the Digi-Access™ [2] home page or continue browsing by using the links below.
The Digi-Access™ certificate offers what is called 'two factor authentication'. Secure online servers and systems offer protected access with a username and password. The username and password is 'something you know' and this is single factor authentication.
In the Digi-Access™ version of the same server, in addition to a username and password, to login you must also have a Digi-Access™ certificate. The Digi-Access™ certificate is 'something you have' and this adds a second layer of security known as two factor authentication.
Once the server or system is configured to support client certificate authentication using Digi-Access™ certificates, getting a Digi-Access™ certificate takes three simple steps [3]. The most important of these is the very first step.
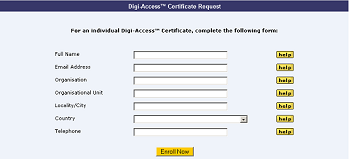
In the first step, you will be directed to the Digi-Access™ enrolment page where you must complete a simple online web form.

IMPORTANT:- Ensure that you complete this form accurately and with correct information about yourself. Failure to complete this form correctly, may mean that your Digi-Access™ certificate is not a correctly configured certificate and you may also have to repeat the process.
The Digi-Access™ certificate web enrolment process is fully compatible with most commonly used web browsers, including: Google Chrome, Microsoft Edge, Mozilla Firefox, Opera and Apple Safari.
There are three very simple steps to getting your Digi-Access™ certificate.
You will receive a Digi-Access™ invitation email message and will be directed to the Digi-Access™ web enrolment page, where you need to complete a simple online web form. This web form has a help button for every field to ensure that you correctly complete it. Use these buttons as required:
In this form - depending on your organisation's custom requirements - you may need to provide various details, such as for example:
In addition, you will also be asked to select a Secret Question, provide a Secret Answer, enter and confirm a Private Key Password:
IMPORTANT NOTE:- You MUST memorise and/or securely store the Private Key Password as it will be required to collect and install your Digi-Access™ certificate later in the process.
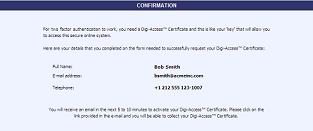
Once the above form is completed and submitted, your Digi-Access™ certificate request will be verified and approved by your organisation's appointed Certificate Operator.
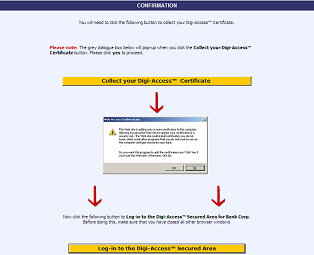
Upon Digi-Access™ certificate request approval, you will receive an email message asking you to complete the certificate collection by clicking the unique link provided in the email message. Follow the on screen instructions to complete the certificate collection by entering your Private Key Password and downloading the certificate P12 file onto your computer device.
Please note the certificate P12 file download location and the name of the certificate file. In most instances, the certificate file name will contain your Full Name (without any white space characters) and will have a ".P12" file extension. You may change the certificate file name if you require so.
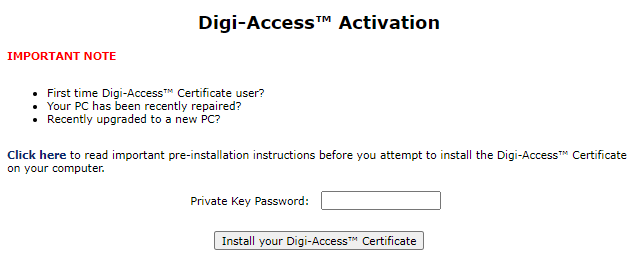
Now that you have your Digi-Access™ certificate P12 file downloaded to your computer device, you can complete the process by installing the certificate and use it with your preferred web browser.
Depending on your web browser choice, the Digi-Access™ certificate import instructions may vary. Please refer to the list below for further certificate import instructions relevant to your web browser.
When certificate installation is complete, you can view the Digi-Access™ certificate by following these instructions:
Viewing Your Digi-Access™ Certificate [6].
On the PC, where you intend to import/install the Client Certificate from a previously downloaded or exported 'Personal Information Exchange - PKCS#12' P12 file:
Importing Client Certificate into Mozilla Firefox
To import a certificate along with the associated private key from a PKCS#12 file (.pfx/.p12) into your Mozilla Firefox web browser:
Depending on your operating system and browser version, you can view your Digi-Access™ two factor authentication certificate using the instructions below:
|
Microsoft® Internet Explorer® |
Mozilla Firefox |
|
1. To view your Digi-Access™ certificate in Microsoft® Internet Explorer®, use the Tools menu (you may have to press the 'Alt' button on your keyboard to view this menu) and then select Internet Options 2. In the Internet Options dialog box, select the Content tab and then click the Certificates button 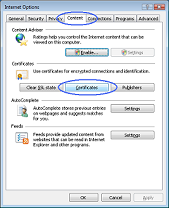 3. In the Certificates dialog box, select the certificate you wish to examine and then click the View button 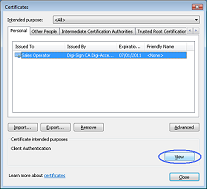 4. The chosen certificate will be displayed where you will be able to see:
 |
1. To view your Digi-Access™ certificate in Mozilla Firefox, use the Tools menu and then select Options 2. In the Options dialog box, select the Encryption tab and then click the View Certificates button 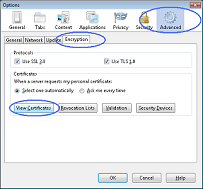 3. In the Certificate Manager dialog box, select the certificate you wish to examine and then click the View button  4. The chosen certificate will be displayed where you will be able to see:
 |
Depending on your operating system and browser version, you can delete your Digi-Access™ two factor authentication certificate using the instructions below:
|
Microsoft® Internet Explorer® |
Mozilla Firefox |
|
|
1. To view your Digi-Access™ certificate in Microsoft® Internet Explorer®, use the Tools menu (you may have to press the 'Alt' button on your keyboard to view this menu) and then select Internet Options 2. In the Internet Options dialog box, select the Content tab and then click the Certificates button 3. In the Certificates dialog box, select the certificate you wish to examine and then click the View button 4. The chosen certificate will be displayed where you will be able to see:
5. Once you have viewed and confirmed this is the Digi-Access™ certificate you wish to remove, return to the Certificates dialog box, select the certificate and click the Remove button |
1. To view your Digi-Access™ certificate in Mozilla Firefox, use the Tools menu and then select Options 2. In the Options dialog box, select the Encryption tab and then click the View Certificates button 3. In the Certificate Manager dialog box, select the certificate you wish to examine and then click the View button 4. The chosen certificate will be displayed where you will be able to see:
5. Once you have viewed and confirmed this is the Digi-Access™ certificate you wish to delete, return to the Certificate Manager dialog box, select the certificate and click the Delete button
|
The instructions below are for the two most popular browsers (i.e. Microsoft Internet Explorer® and Mozilla®). If you are using different web browser you may experience support issues and for security reasons, it is advisable to work with only Microsoft Internet Explorer® and Mozilla® when using Digi-Access™.
Enabling Digi-Access™ client certificates for two factor authentication will take you 5 minutes (or less). Configure your browser by following these simple steps:
1. Download and save this certificate to 'My Documents' or your C: drive:
2. Download and save this certificate to 'My Documents' or your C: drive:
Digi-Acess™ Intermediate CA [8]
3. Click the 'Tools' menu and then select 'Internet Options'. Click the 'Contents' tab and then click the 'Certificates' button. Then select the Trusted Root Certificate Authorities tab and click the Import... button.

4. Run through the six steps of this wizard and ensure that on step v, as below that "Place all certificates in the following store" is selected and points to "Trusted Root Certification Authorities". When the wizard is finished, move to the next step.

5. Repeat step 3. above except this time, select the Intermediate Certification Authorities tab and click the Import... button.

6. Repeat step 3. above except this time, ensure "Place all certificates in the following store" is selected and points to "Intermediate Certification Authorities"
7. Exit out of all the open dialog boxes to finish.
2. Download and save this certificate to 'My Documents' or your C: drive:
Digi-Acess™ Intermediate CA [8]
3. Click the 'Tools' menu and then select 'Options'. Click the 'Advanced' tab and then click the 'Encryption' tab and then the View Certificates button.

4. Then click the Import... button and browse to the DigiSignRootCA.cer certificate and click 'Open'
5. Ensure to enable all (3) three trust options for this CA certificate and click 'OK' to complete the import.
6. Repeat step 5. above except this time, ensure to use DigiSignDigiAccessCA.cer
7. Exit out of all the open dialog boxes to finish.
There are three demonstrations for Digi-Access™. Read the sections below to learn more about this two factor authentication technology and to help complete your understanding of why Digi-Access™ is your best and simplest, online security solution.
Links:
[1] http://www2.digi-sign.com/support/digi-access/administrator
[2] http://www2.digi-sign.com/digi-access
[3] http://www2.digi-sign.com/support/digi-access/user/enrol
[4] http://www2.digi-sign.com/support/digi-access/user/import-windows
[5] http://www2.digi-sign.com/support/digi-access/user/import-firefox
[6] http://www2.digi-sign.com/support/digi-access/user/view
[7] http://www.digi-sign.com/downloads/certificates/dsroot/DigiSignRootCA.cer
[8] http://www.digi-sign.com/downloads/certificates/dsroot/DigiSignDigiAccessCA.cer
[9] http://www2.digi-sign.com/demos/digi-access
[10] http://www2.digi-sign.com/demos/introductions/online+banking
[11] http://www2.digi-sign.com/arp/2x/help/demo
[12] http://www2.digi-sign.com/support/digi-access/user/delete