Securing any on line system with usernames and passwords (single factor authentication) may not offer the level of protection and security your organisation needs. Adding a 'second layer' of protection, called 'two factor authentication [1]' [2FA], is the preferred security option that strengthens the existing username and password access.
|
Digi-Access™ Strong Authentication |
Digi-Access™ Two Factor Authentication |
|
 [2] [2] |
 [3] [3] |
|
Two factor authentication [2FA] is something that you own/posses (e.g. a Digi-Access™ certificate) combined with something that you know (i.e. the username and password). And this is the preferred security option to strengthen user access.
There are alternative [1] two factor authentication [2FA] solutions but none are as easy to implement, or as compatible [4] as Digi-Access™. It literally 'sits in front' of your current systems and for ARP members [5] is a simple additional revenue 'add-on'.
Digi-Access™ is compatible with 27 different servers [4], so adding this second layer of security access does not require any re-programming of your existing environment.
Read More(+) [23]


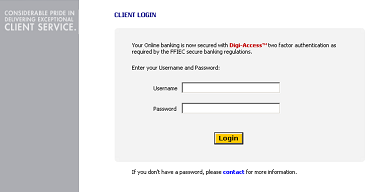 [7]Online Banking Example [7]
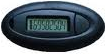 One-Time-Password [OTP] Tokens |
 Digi-Access™ Certificates |
In Favour of OTPAgainst using OTP |
In Favour of Digi-Access™Against using Digi-Access™ |
Perhaps you don't have any plans to increase the security access to your online application. Budgetary restrictions may be another issue. So why not let your users decide if they want this security 'add-on'.
We have a simple programme for this too:
The Man-in-the-Middle [MITM] attack intercepts a communication between two systems. For example, in an http transaction the target is the TCP connection between client and server. Using different techniques, the attacker splits the original TCP connection into 2 new connections, one between the client and the attacker and the other between the attacker and the server, as shown in figure 1. Once the TCP connection is intercepted, the attacker acts as a proxy, being able to read, insert and modify the data in the intercepted communication.
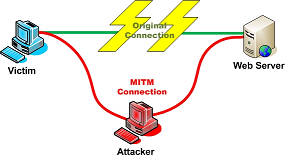
This attack can occur, even when One-Time-Password [OTP] tokens are in use. The MITM system simply takes the password as it is issued and uses it to gain access to the online system.
Using Digi-Access™ the Man-in-the-Middle attack is not possible because it uses completely different 'key-pair' technology. The server must receive the public key from the Digi-Access™ certificate and the MITM server cannot have the correct configuration to request this (because it is not part of the 'trust-link' that is an integral part of the Digi-Access™ 'key-pair' technology). Therefore the MITM attack will fail to work when the user has a Digi-Access™ certificate.
Some systems Administrators will refer to the security bug within Microsoft© CryptoAPI [31]. This security bug means that for users that have Internet Explorer© browsers, it is possible for hackers to break into the Microsoft© Certificate store and misappropriate the Digi-Access™ certificate (this does not apply to Mozilla browser users).
However, this security concern is irrelevant if the user has a properly configured PC with regular Microsoft© updates enabled. As most responsible users do have Microsoft© updates enabled (and you can provide help pages to highlight the issue), then this is as much a risk to end users as protecting their computers from viruses.

Depending on how you decide to implement Digi-Access™ will dictate whether you need a new login page or not.
If you want all users to use Digi-Access™ client certificates for two factor authentication, then you do not make any changes to the login page. You can skip this step and move to Step 2 [18].
Alternatively, if some users will continue using usernames & passwords and other users will use Digi-Access™, then the following are the suggested guidelines to follow:
1. Create a completely new domain directory. For example the new login URL could be:
2. Make a copy of the existing login page and place it in the root, default folder for this new site.
3. There are many ways to implement and manage the database of users and this is one, simple suggestion: copy the user database from the existing website and enable it for the new login page you have created for Digi-Access™
Those users that login with usernames and passwords will continue to do so, as they do currently. Once the server(s) is configured [18], those users that wish to use the two factor authentication login will get their Digi-Access™ certificate [20] and use this, together with their existing username and password for login at the new URL.
Note:- As each new Digi-Access™ certificate is issued, the username and password access to the original login page must be disabled.
Follow the right side link below to learn how easy it is to configure the server to use Digi-Access™ certificates.
The instructions below are for the two most popular servers (i.e. IIS and Apache). If you are using different web server software, use the online contact form for Support [36] and they will supply the instructions for your server.
Enabling Digi-Access™ client certificates for two factor authentication will take you 30 minutes (or less). Configure your server by following these simple steps:
|
For full detailed instructions and explanations, read the Apache Support [37] pages. 1. Download and save this certificate bundle: CA Bundle for Digi-Acess™ [39] 2. Open the httpd.conf file for editing and locate the Virtual Host section for your SSL secured site 3. Add the following directive line into your site/directory configuration section: SSLOptions +StdEnvVars +ExportCertData Once the StdEnvVars is enabled, the standard set of SSL related CGI/SSI environment variables are created. CGI and SSI requests are disabled by default. This is for performance reasons and we do not recommend changing this unless you are an experienced Apache Administrator. For further details and instructions, refer to the Apache Support [37] page 4.Add the following directive line into your site/directory configuration section: SSLVerifyClient require This directive sets the certificate verification level for the Client Certificate Authentication. This directive can be used both on a per-server and a per-directory context. In the per-server context, the client authentication process is applied during the standard SSL handshake when a connection is established. In per-directory context, it forces the SSL re-negotiation with the reconfigured client verification level after the HTTP request was read but before the HTTP response is sent. We recommend that you use the 'require' variable unless you are an experienced Apache Administrator. For further details and instructions, refer to the Apache Support [37] page 5.Add the following directive line into your site/directory configuration section: SSLVerifyDepth 10 This directive sets the depth of 10. This means that the client certificate has to be signed by a CA that is directly known to the server (i.e.: the CA's certificate is under SSLCACertificatePath). We recommend that you use the '10' variable unless you are an experienced Apache Administrator. You can also add the following directive(s) to enable a customised authentication rule, if you choose the Apache web server to be the authentication level: SSL Require This directive specifies a general access requirement which has to be fulfilled in order to allow access. It's a very powerful directive because the requirement specification is an arbitrarily complex Boolean expression containing any number of access checks. We recommend do not recommend using this unless you are an experienced Apache Administrator. For further details and instructions, refer to the Apache Support [37] page Note:- If you are implementing a CGI application with Digi-Access™ some Apache versions may require the following directive to be present: SetEnvIf User-Agent ".*MSIE.*" \ For further details and instructions, refer to the Apache Support [37] page 6. Save your httpd.conf file 7. Restart Apache |
For full detailed instructions and screenshots, read the IIS Support [38] pages. 1. Download and save these two certificates: Digi-Sign Root CA [40] Digi-Sign CA Digi-Access™ Xs [41] 2. On the server, click the Start button, select Run and type MMC, before clicking the 'OK' button 3. You should now be in the Microsoft Management Console and should follow these steps: 4. Now all you need to do is import the Digi-Access™ Root certificate, following these steps: 5. Then import the Digi-Access™ intermediate certificate, as follows: 6. Go to Windows Administrative Tools and open the properties window for the website that you have enabled SSL on. Open the Directory Security by right clicking on the Directory Security tab and then follow these steps: 7. Start Internet Services Manager, or open the MMC that contains the IIS snap-in. |

The Digi-CA™ [43] Certificate Authority [CA] system (that issues the Digi-Access™ end user certificates) can issue thousands of certificates every hour. This 'endless' capacity means that getting Digi-Access™ certificates to the end users can occur as quickly as your environment demands.
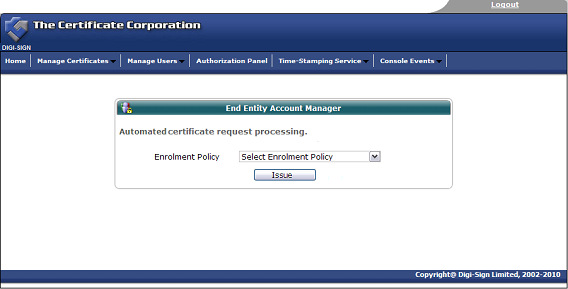
How the Digi-Access™ certificates are issued is set by the 'Enrolment Policy [44]'. The options within the Enrolment Policy are designed to be very flexible. They can be customised to meet almost any requirement with many different settings and combinations. The three basic options are:
Issuing the Digi-Access™ certificates is either a one or two stage process. Either the user receives an email inviting them to apply for their certificate, or they are referred from an existing online site/system to the Certificate Application form.
However the user is prompted to get their certificate, in the first stage, the Digi-CA™ Inviting 'action' requires the end user 'reaction' (completing an application form). In the second stage, the Digi-CA™ Approving 'action' requires the end user 'reaction' (activating the certificate) and this completes the process. It is best understood as follows:
As stated, because the Enrolment Policy is very flexible, there are many different ways to invite and approve end users certificates. The following is a sample issuing process only. You may wish to include other options, as required.
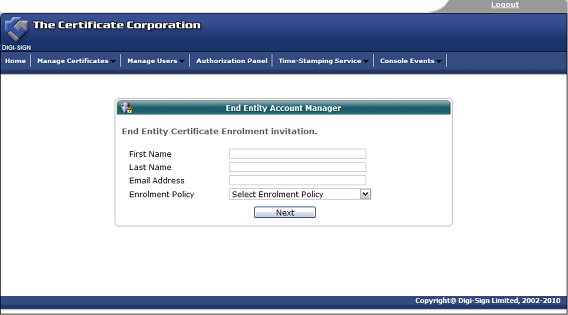
Stage One 'Digi-CA™ Action' - Inviting Digi-Access™ Certificate Applications
Using the Digi-CA™ RA Management Console interface, the Administrator uploads a .CSV batch file inviting [45] as many users as required.

Stage One 'User Reaction' - Completing Enrolment Form
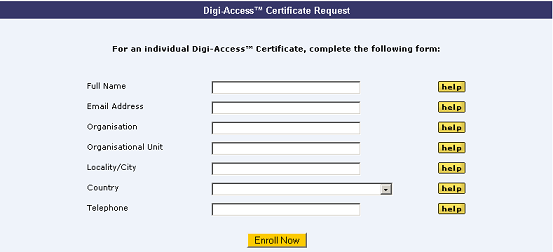
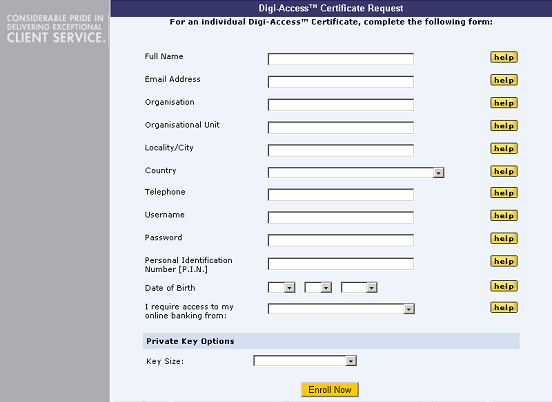
The Digi-CA™ system sends an email to each end user with a unique link to the Digi-Access™ certificate enrolment form. Using the link provided in the email, the end user then completes the Digi-Access™ certificate enrolment form.
Note:- this is the default Digi-Access™ End Entity Digital Certificate Enrolment Form. This form uses basic HTML programming that can be altered [46] to match your specific design requirements.

Once the end user completes all the fields and submits the enrolment form to the Digi-CA™ system, the Administrator is notified. The Administrator then approves [44] each end user application using the Digi-Access™ certificate Authorization Panel.
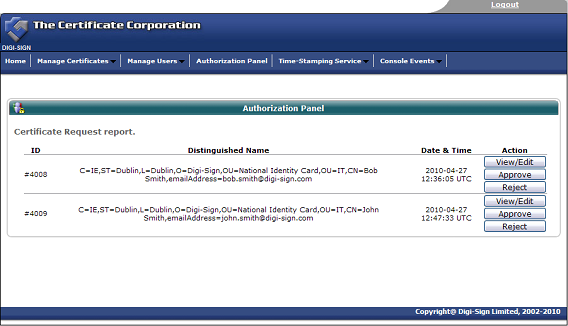
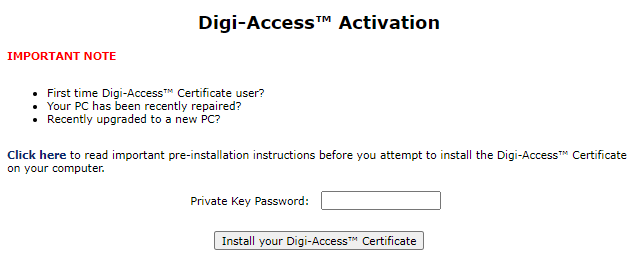
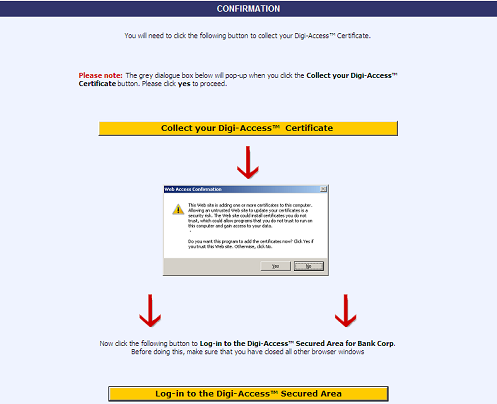
Stage Two 'User Reaction' - Activating the Digi-Access™ Certificate
Assuming the Administrator approves the application, the Digi-CA™ system sends a new email to the end user advising them that their application has been approved. Using the link provided in the email, the end user then activates [47] the Digi-Access™ certificate and this completes the issuing process.

Once the enrolment form is completed and submitted by the end user, the Enrolment Policy enforces how the application is handled by the Digi-CA™ system. Learn more about the Enrolment Policy [44] options or browse the other pages below.
The Digi-Access™ [11] Mobile End Entity Digital Certificate Enrolment Form for mobile users is basic HTML programming that can be altered to match your specific design requirements. Below is a sample of a customised enrolment page:
Note:- In addition to changing the 'look and feel' of the enrolment page you will notice that the fields required on the form can be altered according to the specific Enrolment Policy [44] set by the organisation.
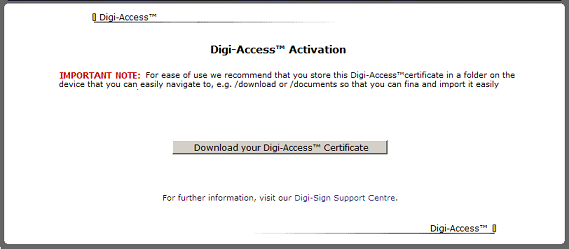
Once the enrolment form is completed and approved, the user is notified by email and uses the link in that email to download [48] and install their Digi-Access™ certificate to their mobile device.
Once the invitation is issued, the end user must complete the enrolment form. View customised enrolment [46] forms or browse the other pages below.

Once the enrolment form is completed and submitted by the end user, the Enrolment Policy enforces how the application is handled by the Digi-CA™ system. Learn more about the Enrolment Policy [44] options or browse the other pages below.
The Digi-Access™ End Entity Digital Certificate Enrolment Form uses basic HTML programming that can be altered to match your specific design requirements. Below are some samples of customised enrolment pages:
Note:- In addition to changing the 'look and feel' of the enrolment page you will notice that the fields required on the form can be altered according to the specific Enrolment Policy [44] set by the organisation.
Once the enrolment form is completed and submitted by the end user, the Enrolment Policy enforces how the application is handled by the Digi-CA™ system. Learn more about the Enrolment Policy [44] options or browse the other pages below.
Digi-Access™ can be used with most modern smart phones and tablets (contact support [49] to check your specific device).

Most error pages on IIS can be customised [51]. The default 403 error pages that relate to the use of Digi-Access™ are stored in the C:\WINDOWS\help\iisHelp\common\ folder. The 2X Application Server Administrator should download the Digi-Access™ error 403 pages [50] and place them in a new folder: (e.g. C:\WINDOWS\help\iisHelp\digi-access\ ). The server should be configured to display these new error pages before being restarted to complete the setup procedure.


|
Microsoft® Internet Explorer® |
Mozilla/Firefox/Safari |
|
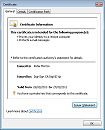
1. To view your Digi-Access™ certificate in Microsoft® Internet Explorer®, use the Tools menu (you may have to press the 'Alt' button on your keyboard to view this menu) and then select Internet Options 2. In the Internet Options dialog box, select the Content tab and then click the Certificates button 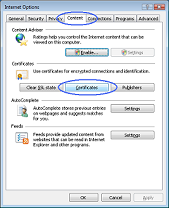 3. In the Certificates dialog box, select the certificate you wish to examine and then click the View button 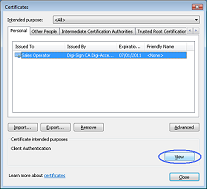 4. The chosen certificate will be displayed where you will be able to see:
 |
1. To view your Digi-Access™ certificate in Mozilla, Firefox or Safari, use the Tools menu and then select Options 2. In the Options dialog box, select the Encryption tab and then click the View Certificates button 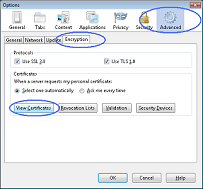 3. In the Certificate Manager dialog box, select the certificate you wish to examine and then click the View button  4. The chosen certificate will be displayed where you will be able to see:
 |

|
Microsoft® Internet Explorer® |
Mozilla Firefox |
|
|
1. To view your Digi-Access™ certificate in Microsoft® Internet Explorer®, use the Tools menu (you may have to press the 'Alt' button on your keyboard to view this menu) and then select Internet Options 2. In the Internet Options dialog box, select the Content tab and then click the Certificates button 3. In the Certificates dialog box, select the certificate you wish to examine and then click the View button 4. The chosen certificate will be displayed where you will be able to see:
5. Once you have viewed and confirmed this is the Digi-Access™ certificate you wish to remove, return to the Certificates dialog box, select the certificate and click the Remove button |
1. To view your Digi-Access™ certificate in Mozilla Firefox, use the Tools menu and then select Options 2. In the Options dialog box, select the Encryption tab and then click the View Certificates button 3. In the Certificate Manager dialog box, select the certificate you wish to examine and then click the View button 4. The chosen certificate will be displayed where you will be able to see:
5. Once you have viewed and confirmed this is the Digi-Access™ certificate you wish to delete, return to the Certificate Manager dialog box, select the certificate and click the Delete button |
Links:
[1] http://www2.digi-sign.com/digi-access/approach
[2] http://www2.digi-sign.com/video/digi-access/strong
[3] http://www2.digi-sign.com/video/digi-access/2fa
[4] http://www2.digi-sign.com/digi-access/compatibility
[5] http://www2.digi-sign.com/arp
[6] http://www2.digi-sign.com/demos/instructions/digi-access
[7] http://www2.digi-sign.com/demos/instructions/online+banking
[8] http://www2.digi-sign.com/arp/2x/help/demo
[9] http://www2.digi-sign.com/digi-access/web
[10] http://www2.digi-sign.com/digi-access/cloud
[11] http://www2.digi-sign.com/digi-access/mobile
[12] http://www2.digi-sign.com/digi-access/saas
[13] http://www2.digi-sign.com/digi-access/extranet
[14] http://www2.digi-sign.com/digi-access/vpn
[15] http://www2.digi-sign.com/digi-access/finance
[16] http://www2.digi-sign.com/digi-access/voip
[17] http://www2.digi-sign.com/digi-access/website
[18] http://www2.digi-sign.com/digi-access/configure
[19] http://www2.digi-sign.com/digi-access/customise
[20] http://www2.digi-sign.com/digi-access/distribute
[21] http://www2.digi-sign.com/digi-access/distribute#approve
[22] http://www2.digi-sign.com/product/digi-access
[23] http://www2.digi-sign.com/javascript:toggle();
[24] http://www2.digi-sign.com/product/digi-access?freetrial
[25] http://www2.digi-sign.com/demos/digi-access
[26] http://www2.digi-sign.com/cell-otp
[27] http://www2.digi-sign.com/support/digi-access/user/mitm
[28] http://www2.digi-sign.com/support/digi-access/user/mitm#cryptoapi
[29] http://www2.digi-sign.com/demos/digi-access#bank
[30] http://www2.digi-sign.com/quote/digi-access
[31] http://www.microsoft.com/technet/security/bulletin/ms02-050.mspx
[32] http://www2.digi-sign.com/support/digi-ssl/generate+csr
[33] http://www2.digi-sign.com/order/digi-ssl/internal/csr-check.php
[34] http://www2.digi-sign.com/support/digi-ssl/install+certificate/index
[35] http://www2.digi-sign.com/support/digi-access/administrator
[36] http://www2.digi-sign.com/contact
[37] http://www2.digi-sign.com/support/digi-access/apache
[38] http://www2.digi-sign.com/support/digi-access/iis
[39] http://www.digi-sign.com/downloads/certificates/digi-access/BundledCAXp.pem
[40] http://www.digi-sign.com/downloads/certificates/dsroot/Digi-Sign_Root_CA.cer
[41] http://www.digi-sign.com/downloads/certificates/digi-access/Digi-Sign_CA_Digi-Access_Xs.cer
[42] http://www2.digi-sign.com/digi-access/configure/ou
[43] http://www2.digi-sign.com/digi-ca
[44] http://www2.digi-sign.com/digi-access/distribute/policy
[45] http://www2.digi-sign.com/digi-access/distribute/invite
[46] http://www2.digi-sign.com/digi-access/distribute/enrol
[47] http://www2.digi-sign.com/digi-access/distribute/activate
[48] http://www2.digi-sign.com/digi-access/mobile/download
[49] http://www2.digi-sign.com/mailto
[50] https://www.digi-sign.com/downloads/download.php?id=digi-access-403
[51] http://technet.microsoft.com/nl-nl/library/cc753103(WS.10).aspx
[52] http://www2.digi-sign.com/403-7.htm
[53] http://www2.digi-sign.com/403-12.htm
[54] http://www2.digi-sign.com/403-13.htm
[55] http://www2.digi-sign.com/403-16.htm
[56] http://www2.digi-sign.com/403-17.htm