Install Digi-SSL™

- How to install your Digi-SSL™ certificate on the server
-
 The final part of your Digi-SSL™ application is the installation of your certificate. Installation of your Digi-SSL™ Certificate will differ greatly dependent on your webserver software. Select your webserver software from the list after reading the following general points:
- General Points to remember:
When you are emailed your Digi-SSL™ certificate, two other certificates will also be attached to the email. Should they be required, you may download these certificates individually or collectively as a bundled file below:
Digi-SSL™ Xs
(needed for Apache & Plesk Administrator installations)
Digi-SSL™ Xp & Digi-SSL™ Xg
(needed for Apache & Plesk Administrator installations)
Installing Apache Mod SSL
Step-by-Step Instructions
Apache OpenSSL
Step by Step Instructions
Java Server
Tomcat Server
C2Net Stronghold
NOTE: You must install both the bundle CA certificate and your server certificate to provide secure access to your Web server.
Get bundle CA file
On start-up, Stronghold loads CA certificates from the file specified by the SSLCACertificateFile entry in its 'httpd.conf' file.
To install your server certificate:
Apache via Ensim Webappliance 3.1.x
Step by Step Instructions
Step one: Loading the Site Certificate
You will receive an email from Digi-Sign with the certificate in the email (yourdomainname.cer). When viewed in a text editor, your certificate will look something like:
-----BEGIN CERTIFICATE-----
MIAGCSqGSIb3DQEHAqCAMIACAQExADALBgkqhkiG9w0BBwGggDCCAmowggHXAhAF
(.......)
K99c42ku3QrlX2+KeDi+xBG2cEIsdSiXeQS/16S36ITclu4AADEAAAAAAAAA
-----END CERTIFICATE-----
Copy your Certificate into the directory that you will be using to hold your certificates. In this example we will use /etc/ssl/crt/. Both the public and private key files will already be in this directory. The private key used in the example will be labelled private.key and the public key will be yourdomainname.cer.
It is recommended that you make the directory that contains the private key file only readable by root.
Login to the Administrator console and select the site that the certificate was requested for.
Select Services, then Actions next to Apache Web Server and then SSL Settings. There should already be a 'Self Signed' certificate saved.
Select 'Import' and copy the text from the yourdomainname.cer file into the box
Select 'Save', the status should now change to successful.
Logout, do not select delete as this will delete the installed certificate.
Step two: Install the Intermediate/Root Certificates
You will need to install the Intermediate and Root certificates in order for browsers to trust your certificate. As well as your SSL certificate ( yourdomainname.cer) two other certificates, named UTN-USERFirst-Hardware.crt and Digi-SignCADigi-SSLXp.crt or
Digi-SignCADigi-SSLXs.crt, are also attached to the email from Digi-Sign. Apache users will not require these certificates. Instead you can install the intermediate certificates using a 'bundle' method.
Download a Bundled cert file
In the Virtual Host settings for your site, in the virtual site file, you will need to add the following SSL directives. This may be achieved by:
1. Copy this ca-bundle file to the same directory as the certificate (this contains all of the ca certificates in the Digi-Sign chain, except the yourdomainname.cer).
2. Add the following line to the virtual host file under the virtual host domain for your site (assuming /etc/httpd/conf is the directory mentioned in 1.), if the line already exists amend it to read the following:
SSLCACertificateFile /etc/httpd/conf/ca-bundle/ca_new.txt
If you are using a different location and certificate file names you will need to change the path and filename to reflect this.
The SSL section of the updated virtual host file should now read similar to this example (depending on your naming and directories used):
Save your virtual host file and restart Apache.
You are now all set to start using your Digi-Sign certificate with your Apache Ensim configuration.
Certificate on a Cobalt RaQ4/XTR
Installing the site certificate
Go to the Server Management screen.
Click the green icon (Wrench for RaQ4, Pencil for XTR) next to the SSL enabled virtual site
Click SSL Settings on the left side.
Copy the entire contents of the site certificate that you received, including
-----BEGIN CERTIFICATE-----
and
-----END CERTIFICATE-----
Paste the new certificate information that you copied into the "Certificate" window.
Select Use manually entered certificate from the pull-down menu at the bottom.
Click Save Changes.

Install the Intermediate Certificates
You will need to install the Intermediate and Root certificates in order for browsers to trust your certificate. As well as your site certificate (yourdomainname.cer) two other certificates, named UTN-USERFirst-Hardware.crt and Digi-SignCADigi-SSLXp.crt or
Digi-SignCADigi-SSLXs.crt,, are also attached to the email from Digi-Sign. Cobalt users will not require these certificates. Instead you can install the intermediate certificates using a 'bundle' method.
Download a Bundled cert file
The following will require that you access the httpd config file. This may be achieved by telnetting into your webserver.
In the Global SSL settings, in the httpd.conf file, you will need to add the following SSL directive.
This may be achieved by:
Copying the bundle file to the same directory as httpd.conf (this contains all of the ca certificates in the Digi-Sign chain).
Add the following line to httpd.conf, if the line already exists amend it to read the following:
SSLCACertificateFile /etc/httpd/conf/ca-bundle/ca_new.txt
NOTE: If you are using a different location and certificate file names you will need to change the path and filename to reflect your server.
Hsphere
Installing your Certificate on Hsphere
1. After you receive your SSL certificate, firstly visit our web site download site file and the bundle file (rootchain) certificates to a secure location.
2. Click SSL on your control panel home page.
3. Go to the Web Service page and click the Edit icon in the SSL field.
4. In the form that opens, enter the SSL certificate into the box Install Certificate based on previously generated Certificate request and click Upload:
5. Enter the rootchain (bundle) certificate into the box Certificate Chain File and click Install:
6. Now you can use the SSL certificate.
IBM HTTP Server
Installing certifications on IBM HTTP Server
IKEYMAN for Certificate Installation
Digi-Sign sends more than one certificate. In addition to the certificate for your server Digi-Sign send an Intermediate CA Certificate (the Digi-Sign certificate) and a Root CA Certificate (UTN-USERFirst-Hardware). Before installing the server certificate, install both of these certificates. Follow the instructions in 'Storing a CA certificate'.
NOTE:If the authority who issues the certificate is not a trusted CA in the key database, you must first store the CA certificate and designate the CA as a trusted CA. Then you can receive your CA-signed certificate into the database. You cannot receive a CA-signed certificate from a CA who is not a trusted CA. For instructions see 'Storing a CA certificate'
Storing a CA Certificate:
To receive the CA-signed certificate into a key database:
Lotus Domino Server v4.6x & v5.0x
Installing certificates on Lotus Domino Server
Requires the certificates to be merged into the Key Ring file. This process must be completed for all three certificates provided.
For additional information, refer to your server documentation.
Microsoft IIS 4.x
Please note: To meet the most recent security standards , we strongly advise to update all servers running MS IIS 4.x with the most recent Service Packs for Windows NT 4.
We also advise to perform an upgrade on the server, of the MS Internet Explorer to at least version 5.5 Service Pack 2.
Microsoft IIS 5.x / 6.x
Installing the Root & Intermediate Certificates
You will have received 3 Certificates from Digi-Sign. Save these Certificates to the desktop of the web server machine, then:
Important: You must now restart the computer or the IISAdmin Service to complete the installation
You may want to test the Web site to ensure that everything is working correctly. Be sure to use https:// when you test connectivity to the site
Microsoft IIS 7 Server 2008
Follow these instructions to install your SSL server certificate:
Important: You must now restart the computer or the IISAdmin Service to complete the installation
You may want to test the Web site to ensure that everything is working correctly. Be sure to use https:// when you test connectivity to the site
Microsoft ISA 2000 Server
Instructions to install certificates on Microsoft ISA 2000 Server
You must first export the SSL certificate of the IIS 4.x / IIS 5.x / IIS 6.x Web site with the associated Private Key. If you do not have this key, ISA server will not allow you to use this certificate for SSL:
NOTE: If you do not have the option to export the Private key then the private key has already been exported to another computer or the key never existed on this computer. You cannot use this certificate on ISA Server. You must request a new certificate for this site for ISA Server.
NOTE: Ensure that you keep the file safe the SSL protocol depends upon this file.
Copy the file that you created to ISA Server.
On the ISA Server, open the MMC:
Now you will need to import the root and intermediate certificates.
On the Microsoft ISA Server:
To install the UTN-USERFirst-Hardware.crt Certificate:
To install the Digi-SignCADigi-SSLXp.crt or Digi-SignCADigi-SSLXs.crt:
Important: You must now restart the computer to complete the install.
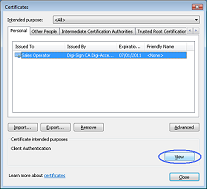
Under the Personal folder, when a subfolder called 'Certificates' is displayed, click "Certificates" and verify that there is a certificate with the name of the Web computer.
Right-click the certificate and then click Properties.
If the 'Intended Purposes' field of the certificate is set to 'All' rather than a list of specific purposes, the following steps must be followed before ISA Server can recognize the certificate:
In the Certificate Services snap-in, open the Properties dialog box of the relevant certificate. Change the Enable all purposes for this certificate option to the Enable only the following purposes option, select all of the items, and then click Apply.
Open the ISA Manager and complete the SSL install:
Restart ISA Server.
Microsoft SMTP Server
1. Installing the Root & Intermediate Certificates
You will have received 3 Certificates from Digi-Sign. Save these Certificates to the desktop of the webserver machine, then:
2. Configuring SMTP Secure Communications:
Important: You must now restart the computer or the IISAdmin Service to complete the installation
Ironport
When you receive your certificates from Digi-Sign there will be your site certificate (named yourdomain.cer) plus 2 others (UTN-USERFirst-Hardware.crt and
Digi-SignCADigi-SSLXp.crt or Digi-SignCADigi-SSLXs.crt), these 2 must be installed as a Trusted Certificate Authority CA and Certificate Chain.
*** Install the SSL Certificate ***
On Ironport's operating system, Async 5.5, you can't install the SSL certificate via the GUI. You must login to the command line (CLI). You can SSH into the CLI and type the following command sequence:
ironport> certconfig
[]> setup
ironport output: paste cert in PEM format (end with '.'):
Copy and paste the .crt/.cer file, including the "-----BEGIN CERTIFICATE-----" and "-----END CERTIFICATE-----" lines. If you're using windows, you may need to open this file with wordpad/notepad.
ironport output: paste key in PEM format (end with '.'):
Copy and paste the server.key.PEMunsecure file.
If you received an intermediate CA certificate, you need to perform an additional step:
ironport output: Do you want to add an intermediate certificate? [N]> Y
Copy and paste the contents of the intermediate CA certificate file here.
ironport>commit
I-Planet Web Server
When you receive your certificates from Digi-Sign there will be your site certificate (named yourdomain.cer) plus 2 others (UTN-USERFirst-Hardware.crt and
Digi-SignCADigi-SSLXp.crt or Digi-SignCADigi-SSLXs.crt), these 2 must be installed as a Trusted Certificate Authority CA and Certificate Chain.
I-Planet Web Server 6.x
Step by step instructions
1. Select the Install Certificate link on the left side of the page.
Once your request has been approved by Digi-Sign Authority and a Digi-SSL™ certificate has been issued, you must install it in the iPlanet Web Server.
2. Select the Security Tab.
3. On the left frame, choose the Install Certificate link.

The screenshot depicts the following options:
Certificate For - This Server, Server Certificate Chain, or Trusted Certificate Authority (CA); a drop-down menu to select the module to use with this certificate ("nobody@engineering" is displayed as the default); a field for the Key Pair File Password; a field to enter the Certificate Name (Note: enter certificate name ONLY if this certificate is not for 'This Server'); a field to enter the message file or a field to enter the message text with headers.
Select Trusted Certificate Authority CA, enter the password and copy the text from the
UTN-USERFirst-Hardware to the Message Text box (including the BEGIN and END lines), then click 'OK'.
Accept the certificate.
NOTE:: Do not shutdown or restart the server until all steps have been completed.
Repeat the steps from above using the text from the Digi-Sign CA Digi-SSL Xs™ or
Digi-Sign CA Digi-SSL Xp™and choosing the 'Certificate Chain' option.
4. Fill out the form to install your certificate:
5. Choose Message text (with headers) and paste the text you copied from your certificate file: your_domain.cer
6. Click the OK button at the bottom of the page.
You are shown some basic information about the certificate.
7. If everything looks correct, click the Add Server Certificate button.
On-screen messages tell you to restart the server. This is not necessary, as the web server instance has been shut down the entire time. You are also notified that in order for the web server to use SSL the web server must be configured to do so. Use the following procedure to configure the web server.
Configuring SSL on iPlanet Web Server 6.X
1. Click the Preferences tab near the top of the page.
2. Select the Edit Listen Sockets link on the left frame.
The main frame lists all the listen sockets set for the web server instance.
a. Alter the following fields:
b. Click the OK button to apply these changes.
In the security field of the Edit Listen Sockets page, there should now be an Attributes link.
3. Click the Attributes link.
4. Enter the user@realm-name password to authenticate to the user@realm-name on the system.
5. Select SSL settings from the pop-up window.
You can choose Cipher Default settings, SSL2, or SSL3/TLS. The default choice does not show the default settings. The other two choices require you to select the algorithms you want to enable.
6. Select the certificate for the user@realm-name followed by: Server-Cert (or the name you chose if it is different).
Only keys that the appropriate user@realm-name owns appear in the Certificate Name field.
7. When you have chosen a certificate and confirmed all the security settings, click the OK button.
8. Click the Apply link in the far upper right corner to apply these changes before you start your server.
9. Click the Load Configuration Files link to apply the changes.
You are redirected to a page that allows you to start your web server instance.
If you click the Apply Changes button when the server is off, a pop-up window prompts you for a password. This window is not resizable, and you might have problem submitting the change.
There are two workarounds for the problem noted above:
10. Provide the requested passwords in the dialog boxes to start the server.
You are prompted for one or more passwords. At the Module Internal prompt, provide the password for the web server trust database.
11. At the Module user@realm-name prompt, enter the password you set when you created user in the realm-name using secadm.
12. Verify the new SSL-enabled web server at the following URL:
Sun ONE 6.x
When you receive your Digi-SSL™ certificate back from Digi-Sign, it will be encrypted with your public key so that only you can decrypt it. Only by entering the correct password for your trust database, can you decrypt and install your certificate.
There are three types of certificates:
A certificate chain is a hierarchical series of certificates signed by successive certificate authorities. A CA certificate identifies a certificate authority (CA) and is used to sign certificates issued by that authority. A CA certificate can in turn be signed by the CA certificate of a parent CA, and so on, up to a Root CA.
The server will use the key-pair file password you specify to decrypt the certificate when you install it. You can either save the certificates somewhere accessible to the server, or copy them in a text format and be ready to paste them into the Install Certificate form, as described here.
Installing a Certificate
To install a certificate, perform the following steps:
1. Access either the Administration Server or the Server Manager and choose the Security tab.
For the Server Manager you must first select the server instance from the drop-down list.
2. Click the Install Certificate link.
3. Check the type of certificate you are installing:
4. Select the Cryptographic Module from the drop-down list.
5. Enter the Key-Pair File Password.
6. Leave the a name for the certificate field blank if it is to be the only one used for this server instance, unless:
7. Select either:
8. Click OK.
9. Select either:
10. Repeat steps from point 2 to 9 for each individual certificate you received from Digi-Sign and ensure you select the correct certificate type, that you are installing. We recommend, that you install certificates in the following order:
11. For the Server Manager, click Apply, and then Restart for changes to take effect.
The certificate is stored in the server's certificate database. The filename will be:
-cert7.db. For example: https-serverid-hostname-cert7.db
Oracle Web Application Server
Step by step instructions
Plesk Server Administrator 2.5
Step by Step Instructions
Important: Installation is a two-step process - ensure you follow both steps listed below:
Certificate with Plesk 5.0
Step by Step Instructions
Important: Installation is a two-step process - ensure you follow both steps listed below.
Plesk 6.0
Uploading certificate parts
If you have already obtained a certificate containing private key and certificate part (and may be CA certificate), follow these steps to upload it:
1. At the certificate repository page, click on the ADD button. You will be taken to the SSL certificate creation page.
2. In the Upload certificate files section of the page, use the Browse button to locate the appropriate certificate file or a required certificate part.
3. Click SEND FILE. This will upload your certificate parts to the repository.
You can upload an existing certificate in two ways:
1. Choose a file from the local network and click on the SEND FILE button (.TXT files only).
2. Type in or paste the certificate text and private key into the text fields and click on the SEND TEXT button.
Uploading a CA certificate
For the Digi-Sign CA Digi-SSL Xs or Digi-Sign CA Digi-SSL Xp is the CA Certificate, or rootchain certificate. The CA Certificate is used to appropriately identify and authenticate the certificate authority, which has issued your SSL certificate. To upload your CA Certificate, follow these steps:
1. At the certificate repository page, select a certificate from the list. You will be taken to the SSL certificate properties page.
2. Use the Browse button, within the section related to the certificate uploading, to locate the appropriate CA Certificate file.
3. Click SEND FILE. This will upload your CA Certificate to the repository.
NOTE: When you add a certificate, it is not installed automatically onto the domain or assigned to an IP address, but only added to the Certificate repository. You can assign a certificate to an IP address at the Client's IP pool
Plesk 7.0
Step by Step Instruction
1. Login to the Plesk 7 Control Panel.
2. From the left hand menu, select 'Domains'.
3. Click on the domain name that the certificate is for.
4. Click on the 'Certificates' menu item.
5. There is a button in the middle of the page labelled 'Browse'. Click 'Browse' and navigate to the location of the saved site certificate you received. Selecting it, then select 'Send File', this will upload and install the certificate against the corresponding Private Key.
6. The certificate name will now appear in the list of certificates at the bottom of the page.
7. Click on the name of the Certificate from the list.
8. The box on the page labelled 'CA Certificate'. You will need to paste both the intermediate certificate and UTN-USERFirst-Hardware certificate from the .zip file you have received into this box.
They must be pasted this in order, the Digi-Sign intermediate certificate first, followed by the UTN-USERFirst-Hardware, the result will look similar to the example below (Please note: no blank line between then end of one certificate and the start of the next):
-----BEGIN CERTIFICATE-----
MIIEyDCCBDGgAwIBAgIEAgACmzANBgkqhkiG9w0BAQUFADBFMQswCQYDVQQGEwJV
UzEYMBYGA1UEChMPR1RFIENvcnBvcmF0aW9uMRwwGgYDVQQDExNHVEUgQ3liZXJU
.....
zs1x+3QCB9xfFScIUwd21LkG6cJ3UB7KybDCRoGAAK1EqlzWINlVMr5WlvHqvaDj
vA2AOurM+5pX7XilNj1W6tHndMo0w8+xUengDA==
-----END CERTIFICATE-----
-----BEGIN CERTIFICATE-----
MIIB+jCCAWMCAgGjMA0GCSqGSIb3DQEBBAUAMEUxCzAJBgNVBAYTAlVTMRgwFgYD
VQQKEw9HVEUgQ29ycG9yYXRpb24xHDAaBgNVBAMTE0dURSBDeWJlclRydXN0IFJv
.....
IjeaY8JIILTbcuPI9tl8vrGvU9oUtCG41tWW4/5ODFlitppK+ULdjG+BqXH/9Apy
bW1EDp3zdHSo1TRJ6V6e6bR64eVaH4QwnNOfpSXY
-----END CERTIFICATE-----
9. Click the 'Send Text' button.
10. Now click 'Up Level' from the top right of the screen and choose 'Setup'.
11. At the top of the page, change the 'SSL Certificate' drop-down menu to the certificate you have just installed.
12. Click the 'Server' item from the left hand menu.
13. Click on the 'Service Management' menu item.
14. You now need to Stop and Start the Apache process.
NOTE: Restarting Apache will NOT work. You must stop the service, then start it again to complete the installation
Plesk 7.5
Accessing the Domain SSL Certificates Repository
BEA Systems Weblogic
When you receive your certificates you need to store them in the mydomain directory.
NOTE: If you obtain a private key file from a source other than the Certificate Request Generator servlet, verify that the private key file is in PKCS#5/PKCS#8 PEM format.
To use a certificate chain, append the additional PEM-encoded digital certificates to the digital certificate that issued for the WebLogic Server (the intermediate CA certificate). The last digital certificate in the file chain will be the Root certificate that is self-signed. (example below:)
-----BEGIN CERTIFICATE-----
MIIB+jCCAWMCAgGjMA0GCSqGSIb3DQEBBAUAMEUxCzAJBgNVBAYTAlVTMRgwFgYD
.....(your Intermediate CA certificate).....
bW1EDp3zdHSo1TRJ6V6e6bR64eVaH4QwnNOfpSXY
-----END CERTIFICATE-----
-----BEGIN CERTIFICATE-----
MIIE0DCCA7igAwIBAgIQMKeebbHpGVqxyFDTln1j1TANBgkqhkiG9w0BAQUFADBv
.....(your Root CA certificate).....
WjEZgqr9NaoNZCZpyfZxPsOFYzoxLYEmJs3AJHxkhIHg6YQU
-----END CERTIFICATE-----
Configure WebLogic Server to use the SSL protocol; you need to enter the following information on the SSL tab in the Server Configuration window:
Storing Private Keys and Digital Certificates
Once you have a private key and digital certificate, copy the private key file generated by the Certificate Request Generator servlet and the digital certificate you received into the mydomain directory. Private Key files and digital certificates are generated in either PEM or Definite Encoding Rules (DER) format. The filename extension identifies the format of the digital certificate file. A PEM (.pem) format private key file begins and ends with the following lines, respectively:
-----BEGIN ENCRYPTED PRIVATE KEY-----
-----END ENCRYPTED PRIVATE KEY-----
A PEM (.pem) format digital certificate begins and ends with the following lines, respectively:
-----BEGIN CERTIFICATE-----
-----END CERTIFICATE-----
NOTE: Typically, the digital certificate file for a WebLogic Server is in one file, with either a .pem or .der extension, and the WebLogic Server certificate chain is in another file. Two files are used because different WebLogic Servers may share the same certificate chain.
The first digital certificate in the certificate authority file is the first digital certificate in the WebLogic Server's certificate chain. The next certificates in the file are the next digital certificates in the certificate chain. The last certificate in the file is a self-signed digital certificate that ends the certificate chain. A DER (.der) format file contains binary data. WebLogic Server requires that the file extension match the contents of the certificate file.
NOTE: If you are creating a file with the digital certificates of multiple certificate authorities or a file that contains a certificate chain, you must use PEM format. WebLogic Server provides a tool for converting DER format files to PEM format, and visa versa.
Website Pro 3.x
When your certificate is issued you will receive 4 certificates:
Yourdomain.cer
Digi-SignCADigi-SSLXp.crt or Digi-SignCADigi-SSLXs.crt
UTN-USERFirst-Hardware.crt
WebStar 4.x
Step by step Instructions
Step 1: Copy your SSL Certificate to file
You will receive an email from us with your SSL certificate in the email. Copy & paste your SSL Certificate (including the -----BEGIN NETSCAPE CERTIFICATE CHAIN----- and -----END NETSCAPE CERTIFICATE CHAIN----- headers) into a raw text editor such as BBEdit or Notepad, ensuring that no extra line spaces or extra characters are inserted into the data. Choose to save the file as yourdomainname.txt.
Step 2: Install your SSL Certificate
When you have chosen your cipher settings, click Save again to send the information to the server.
WS FTP Server
Applying certificates
Zeus
When you receive your certificates there will be 3 files, open a text editor and then copy the text from each certificate into the text editor to form one file. The certificates should be pasted in the following sequence, your site Certificate named yourdomain.cer, Digi-SignCADigi-SSLXp.crt or Digi-SignCADigi-SSLXs.crt , UTN-USERFirst-Hardware.crt, and the resulting file should look like the following:
-----BEGIN CERTIFICATE-----
(Your Site Certificate Encoded Text)
-----END CERTIFICATE-----
-----BEGIN CERTIFICATE-----
(Class3CertificateAthority Encoded Text)
-----END CERTIFICATE-----
-----BEGIN CERTIFICATE-----
(TrustRootCertificateAuthority Encoded Text)
-----END CERTIFICATE-----
Please note: Make sure you include the -----BEGIN CERTIFICATE----- and -----END CERTIFICATE----- as displayed above.
1. Login to the web server.
2. Select SSL certificates
3. Select Generate CSR (or Replace Certificate) against the certificate set
4. Copy/Paste the text from the text editor into the Signed Certificate box and click OK.
5. Then select Accept this Certificate
6. The certificate set now needs assigning to the web site. Click on the Home icon. Put a tick in the box next to the virtual server to configure and select configure.
7. Click on SSL Enabled.
8. Enable SSL and select the certificate set to use.
9. Apply and commit the changes then restart the web server.
SSL FAQ
Frequently Asked Questions on Digi-SSL™
The following are frequently asked questions on the most popular web servers that use Digi-SSL™ Secure Soctket Layer [SSL] security.
Frequently Asked Questions - Apache
- Do I need to install all the certificates that I received?
No, Apache users should use the bundle file on the support page instead of the Digi-Sign and GTE certificate:
http://www.digi-sign.com/support/digi-ssl/install+certificate/index
If you do not install the bundle file you will receive not trusted messages when you go to the secure area of your web site.
back to top
- I have accidentally deleted my Private Key
First check your backups and see if you can re-install the Private Key. If you don't know how to re-install the key from your backups, then contact your systems administrator. Failing that, contact your server software vendor for technical support. The only alternative course of action available is a re-issuance of the certificate following the re-submitting of a replacement CSR.
back to top
- I am being told that my Certificate/Key is invalid
There may not be a corresponding Private Key or the key that is found is not the one that matches the certificates.
You may also see this error: "OpenSSL: error:0B080074:x509 certificate
outines:x509_check_private_key:key values mismatch"
back to top
- Do I need to use IP based hosting or Name based hosting?
Name based hosting is rarely used in production environments. IP based hosting should be used due to the way that the SSL protocol works.
back to top
- What is the difference between Apache Mod_SSL and OpenSSL when installing my certificate?
There is no difference, the process is the same and the directives used are the same. Apache fails on start up, what could cause this?
If the key file has a Passphrase you need to remove it, as Apache cannot read this on start-up, you can do that with the following command: openssl rsa -in file1.key -out file2.key
file2.key will contain your unencrypted key If you used Mozilla to download the file, it may have saved the file in compressed format.
back to top
- Can I change the IP address?
The certificate is not bound to any specific IP address. It is bound to the fully qualified domain name such as www.digi-sign.com .
back to top
- I get 'The Page Cannot Be Displayed' when going to the HTTPS page
Is the SSL port opened, this is usually port 443. (listen 443) Is the firewall set to allow the SSL port through. Has the server been rebooted Make sure 'Use SSL 3.0' is ticked in the web browser options.
back to top
- Normal PC browsers work OK, but I get 'Not Trusted' messages when I go to the same page with the MAC
This is usually caused by the directive SSLCertificateChainFile being used instead of the SSLCACertificateFile directive.
back to top
- Error: "Data decryption error"
This error message occurs because there are directives missing from the httpd.conf file. Most web servers can be configured to 'talk' to various browser versions in a different way, the fix for this particular problem is to add the following directives to the httpd.conf file so allowances can be made for Internet Explorer on the Mac:
SSLSessionCache dbm:/var/cache/httpd/ssl_cache
SSLSessionCacheTimeout 300.
back to top
- I get the message "There are secure and non-secure items on the page, Would you like to proceed?"
The error means that there are embedded objects or HTML tags on the page that are not being called absolutely secure. For example, a page that is loaded securely (HTTPS), and contains an image tag within the source code such as IMG SRC =http://www.yyy.com/image.gif. In this case the image is being called absolutely using the non-secure (HTTP) protocol.
back to top
- When I access my secure site, a certificate for another site is displayed
This problem occurs if you assign the same IP address to each host in your config file. SSL does not support name based virtual hosting (host headers are encrypted in SSL), so only the first certificate listed in your config file will be used.
back to top
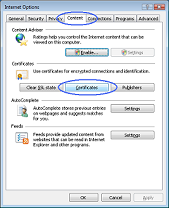
- Browsers are saying that something is not trusted
The Root Certificates and/or Intermediate Certificates may not be installed correctly. This can be checked by clicking on 'View Certificates' when you get the error message and seeing if all three certificates are visible.
It may also be that the certificate being used is not for the Fully Qualified Domain Name, check again using 'View Certificates' to see if the domain name on the certificate matches the domain name in the URL that you are going to.
Check your 'Internet Options' and make sure that 'Use SSL 3.0' is ticked in the 'Advanced' section. Check your .conf file to ensure that SSL Protocol version 3 is allowed.
back to top
- I get an intermittent server not found message when trying to access my site
If the web server is set to check the Certificate Revocation List and the server is down, this can cause a time-out of the operation. This will not be the certificates, but something related to the browser timing out on the operation.
When I connect via HTTPS to an Apache with Mod_SSL or OpenSSL server with Microsoft Internet Explorer (MSIE) I get various I/O errors. What is the reason?
The first reason is that the SSL implementation in some MSIE versions has some subtle bugs related to the HTTP keep-alive facility and the SSL close notify alerts on socket connection close. Additionally the interaction between SSL and HTTP/1.1 features are problematic with some MSIE versions, too. You've to work-around these problems by forcing Apache with Mod_SSL or OpenSSL to not use HTTP/1.1, keep-alive connections or sending the SSL close notify messages to MSIE clients. This can be done by using the following directive in your SSL-aware virtual host section:
SetEnvIf User-Agent ".*MSIE.*" nokeepalive ssl-unclean-shutdown downgrade-1.0 force-response-1.0
Additionally it is known some MSIE versions also have problems with particular ciphers. Unfortunately you cannot workaround these bugs only for those MSIE particular clients, because the ciphers are already used in the SSL handshake phase. So a MSIE-specific SetEnvIf doesn't work to solve these problems.
Instead you have to do more drastic adjustments to the global parameters. But before you decide to do this, make sure your clients really have problems. If not, do not do this, because it affects ALL of your clients.
back to top
- Error: "no start line:pem_lib.c" or "no end line:pem_lib.c"
Apache-SSL uses a toolkit called OpenSSL for its security routines. OpenSSL is very particular about the format of certificate requests and certificates. This error is specifically related to the format of the certificate.
Check that there are 5 dashes before and after the BEGIN and END text, and they must form the first and last lines of the certificate.
In particular, the BEGIN and END lines must look like:
-----BEGIN CERTIFICATE-----
Encoded Certificate
-----END CERTIFICATE-----
Be careful when you cut and pasted the certificate from the browser window into a text editor to create the certificate text file.
Make sure you remove any trailing spaces, before and after the BEGIN or END lines, or you will see this error.
back to top
- Error: "Unable to configure RSA server private key"
Specify the correct private key for the certificate.
Compare the modulus of certificate against the modulus of the private key to see if they match by using the following commands:
To view the certificate modulus:
Openssl x509 -noout -text -in certfile –modulus
To view the key:
Openssl rsa -noout -text -in keyfile –modulus
Check that the certificate and private key is saved in notepad and that it has no trailing spaces.
The "modulus" and "public exponent" portions in the key and the certificate must match exactly
back to top
- Error: "OpenSSL: error:0B080074:x509 certificate outines: x509_check_private_key: key values mismatch"
This error message occurs if you are using the incorrect certificate or private key during installation. So you need to use the matching key and certificate files. To check that the public key in your cert matches the public portion of your private key, view both files, and compare the modulus values with the following instructions:
To view the certificate:
Openssl x509 -noout -text -in certfile
To view the key:
Openssl rsa -noout -text -in keyfile
The "modulus" and "public exponent" portions in the key and the certificate must match exactly. If the "modulus" do not match exactly then you are using either the incorrect private key or certificate.
back to top
Frequently Asked Questions - IIS 5.x & 6.0
- Do I need to install all the certificates that I received?
-
Yes, if you do not install all the received certificates you will receive not trusted messages when you go to the secure area of your web site.
back to top
- I have accidentally deleted my "pending request" or "private key"
-
First check your backups and see if you can re-install the "pending request" or "private key". If you don't know how to re-install the key from your backups, then contact your systems administrator. Failing that, contact your server software vendor for technical support. The only alternative course of action available is a re-issuance of the certificate following the re-submitting of a replacement CSR.
back to top
- I am being told that my Certificate/Key is invalid
-
There may not be a corresponding 'private key' or 'pending request' or the key that is found is not the one that matches the certificates.
back to top
- Do I need to use IP based hosting or Name based hosting?
-
Name based hosting is rarely used in production environments. IP based hosting should be used due to the way that the SSL protocol works.
back to top
- I get 'The Page Cannot Be Displayed' when going to the HTTPS page
-
Is the SSL port opened, this is usually port 443.
Is the firewall set to allow the SSL port through?
Has the server been rebooted?
Make sure 'Use SSL 3.0' is ticked in the web browser options.
back to top
- I get the message "There are secure and non-secure items on the page? Would you like to proceed?"
-
The error means that there are embedded objects or HTML tags on the page that are not being called absolutely secure. For example, a page that is loaded securely (HTTPS), and contains an image tag within the source code such as IMG SRC =http://www.yyy.com/image.gif. In this case the image is being called absolutely using the non-secure (HTTP) protocol.
back to top
- Can I change the IP address?
-
The certificate is not bound to any specific IP address. It is bound to the fully qualified domain name such as www.digi-sign.com .
back to top
- When I access my secure site, a certificate for another site is displayed
-
This problem occurs if you assign the same IP address to each host in your config file. SSL does not support name based virtual hosting (host headers are encrypted in SSL), so only the first certificate listed in your config file will be sent.
back to top
- Browsers are saying that something is not trusted
-
The Root Certificates and/or Intermediate Certificates may not be installed correctly. This can be checked by clicking on 'View Certificates' when you get the error message and seeing if all three certificates are visible.
It may also be that the certificate being used is not for the Fully Qualified Domain Name, check again using 'View Certificates' to see if the domain name on the certificate matches the domain name in the URL that you are going to.
Check your 'Internet Options' and make sure that 'Use SSL 3.0' is ticked in the 'Advanced' section.
back to top
- Error: 'This page must be viewed over a secure channel'
-
Microsoft IIS is configured to require a secure channel.
The following steps will allow non-secure (http) connections to your site:
Within Microsoft Internet Information Server, right click on your web site.
Under Secure Communications, click on Edit.
Un-check the box that says 'Require Secure Channel'
back to top
- I get an intermittent server not found message when trying to access my site
-
If the web server is set to check the Certificate Revocation List and the server is down, this can cause a time-out of the operation.
This will not be the certificate, but something related to the browser timing out on the operation.
back to top
- How do I back up my private key in IIS 5?
-
Start, run, type mmc
Go into the Console Tab, Add/Remove Snap in
Click on Add, Double Click on Certificates and Click on Add > OK
Choose Computer Account
Choose Local Computer
Open up the Certificates Consol Tree
Look for a folder labelled REQUEST, then select Certificates
Highlight the key that you wish to back up
Right click on the file and choose, All Tasks, Export
Follow the Certificate Export Wizard
Choose to mark the Private key as exportable
Leave default settings
Choose to save file on a set location.
Click Finish
You will get message that the export was successful
Note: Once the Pending Request is completed the Key is no longer available
back to top
- How do I move the certificate and key from IIS5 to Apache?
-
Start the certificates mmc for the web server and select 'All Tasks', 'Export' against the site certificate. Do not choose to export the CA certificates. Specify a password. Specify a filename (e.g. mypkcs12.pfx). Copy the resulting .pfx file to your Apache web server.
Then import the private key and cert file into Apache using the following commands:
openssl pkcs12 -in mypkcs12.pfx -out pfxoutput.txt
You'll need to enter the password at least once.
Load pfxoutput.txt into a text editor and save each certificate as a separate file.
Also save the private key as a separate file (e.g. myencrypted.key).
The private key will probably be encrypted at the moment. i.e. looking something like.....
-----BEGIN RSA PRIVATE KEY-----
Proc-Type: 4,ENCRYPTED
DEK-Info: DES-EDE3-CBC,.........
.........
-----END RSA PRIVATE KEY-----
If the version of Apache we're using doesn't allow encrypted private keys, to decrypt the private key run the following command:
Openssl rsa -in myencrypted.key -out my.key
back to top
- How do I force SSL for specific pages?
-
To use ASP to force SSL for specific pages follow the directions at the following url:
http://support.microsoft.com/default.aspx?scid=kb;EN-US;q239875
back to top
- How do I export the key in IIS 5?
-
Please refer to the following URL on Microsoft's Knowledgebase: http://support.microsoft.com/support/kb/articles/Q232/1/36.ASP
back to top
- How do I import the server certificate in IIS 5?
-
Please refer to the following URL on Microsoft's Knowledgebase: http://support.microsoft.com/support/kb/articles/Q232/1/37.ASP
back to top
- How do I create a renewal CSR in IIS 5?
-
Create a new web site in IIS, then go to the 'Properties', 'Directory Security', 'Server Certificate' tab.
Use the certificate wizard to create your new Key/CSR file
Backup the private key file by following the instructions:
Start, run, type mmc, select OK
Go into the Console Tab, Add/Remove Snap in
Click on "Add". Double Click on "Certificates" and Click on "Add", click "OK"
Choose Computer Account, then Local Computer
Open up the Certificates Consol Tree
Look for a folder called REQUEST, Certificates
Highlight the key that you wish to back up
Right click on the file and choose, All Tasks, Export
Follow the Certificate Export Wizard
Choose to mark the Private key as exportable
Leave default settings
Choose to save file on a set location.
It is important to take a copy of the private key and store it off the server; in the event
that the server crashes.
Click Finish
You will get message that the export was successful
Save the resultant CSR file to your hard drive indicating it is a renewal CSR
Use this CSR during the purchase process.
Once you receive the renewed certificate, install it using the wizard you used to create it
on the same NEW website you created.
Once installed, go to the correct website you want the certificate to run on.
Go to 'Properties', 'Directory Security', 'Server Certificate', remove the certificate currently installed, and assign the certificate you installed in the previous step
Restart the WWW service
back to top
- Error: "The string contains an invalid X470 name, attribute key, OID, value or delimiter"
-
To avoid this error, create a new certificate and verify that there are no special characters in any of the fields in the distinguished name.
In particular, do not include a comma in the company name.
The following characters are not allowed in any of the CSR fields:
[! @ # $ % ^ * ( ) ~ ? > < & / \ , . " ']
back to top
- Error: "The pending certificate request for this response file was not found. This request may be cancelled. You cannot install selected response certificate using this Wizard"
-
You are attempting to install a certificate that does not match the private key (Pending request) that is currently residing in the Certificate Wizard. Microsoft IIS 5 only allows you to make one request per site. If you create a new CSR for the same website, your original request (and private key) will be overwritten.
If you have a backup of the private key, you can install the certificate via the MMC if you can restore the request to the REQUEST folder.
Unless you can find the matching private key for the certificate, you will need to have the certificates reissued.
back to top
- My browser stopped responding to my SSL server, other browsers can connect from a different location?
-
Microsoft has released a fix for this error. Please refer to the relevant knowledge base article Q285821, which can be found at the following url:
http://support.microsoft.com/default.aspx?scid=kb;EN-US;q285821
back to top
- How do I backup the certificate and key in IIS5?
-
Start the certificates mmc for the web server and select 'All Tasks', 'Export' against the site certificate. Choose to export the CA certificates. Specify a password. Specify a filename (e.g. mypkcs12.pfx). Save the .pfx file in a safe place off the server.
back to top
Frequently Asked Questions - Cobalt Raq
- I have accidentally deleted my Private Key
-
First check your backups and see if you can re-install the Private Key. If you don't know how to re-install the key from your backups, then contact your systems administrator. Failing that, contact your server software vendor for technical support. The only alternative course of action available is a re-issuance of the certificate following the re-submitting of a replacement CSR.
back to top
- I am being told that my Certificate/Key is invalid
-
There may not be a corresponding Private Key or the key that is found is not the one that matches the certificates.
You may also see this error: "OpenSSL: error:0B080074:x509 certificate outines:x509_check_private_key:key values mismatch"
back to top
- Do I need to use IP based hosting or Name based hosting?
-
Name based hosting is rarely used in production environments.
IP based hosting should be used due to the way that the SSL protocol works.
back to top
- Cobalt (Apache) fails on start up, what could cause this?
-
If the key file has a pass phrase you need to remove it, as Apache cannot read this on start-up, you can do that with the following command:
Openssl rsa -in file1.key -out file2.key
File2.key will contain your unencrypted key
If you used Mozilla to download the file, it may have saved the file in compressed format
I get 'The Page Cannot Be Displayed' when going to the HTTPS page
Is the SSL port opened, this is usually port 443. (Listen 443)?
Is the firewall set to allow the SSL port through?
Has the server been rebooted?
Make sure 'Use SSL 3.0' is ticked in the web browser options.
back to top
- Error: "Data decryption error"
-
This error message occurs because there are directives missing from the httpd.conf file. Most web servers can be configured to 'talk' to various browser versions in a different way, the fix for this particular problem is to add the following directives to the httpd.conf file so allowances can be made for Internet Explorer on the Mac:
SSLSessionCache dbm:/var/cache/httpd/ssl_cache
SSLSessionCacheTimeout 300.
back to top
- I get the message "There are secure and non-secure items on the page? Would you like to proceed?"
-
The error means that there are embedded objects or HTML tags on the page that are not being called absolutely secure. For example, a page that is loaded securely (HTTPS), and contains an image tag within the source code such as IMG SRC =http://www.yyy.com/image.gif. In this case the image is being called absolutely using the non-secure (HTTP) protocol.
back to top
- Can I change the IP address?
-
The certificate is not bound to any specific IP address. It is bound to the fully qualified domain name such as www.digi-sign.com .
back to top
- When I access my secure site, a certificate for another site is displayed
-
This problem occurs if you assign the same IP address to each host in your config file. SSL does not support name based virtual hosting (host headers are encrypted in SSL), so only the first certificate listed in your config file will be sent.
back to top
- Browsers are saying that something is not trusted
-
The Root Certificates and/or Intermediate Certificates may not be installed correctly. This can be checked by clicking on 'View Certificates' when you get the error message and seeing if all three certificates are visible.
It may also be that the certificate being used is not for the Fully Qualified Domain Name, check again using 'View Certificates' to see if the domain name on the certificate matches the domain name in the URL that you are going to.
Check your 'Internet Options' and make sure that 'Use SSL 3.0' is ticked in the 'Advanced' section.
Also ensure that SSL Protocol version 3 is supported.
The bundle file must also be specified in the Global SSL section of the. conf file.
back to top
- I get an intermittent server not found message when trying to access my site
-
If the web server is set to check the Certificate Revocation List and the server is down, this can cause a time-out of the operation.
This will not be the certificate, but something related to the browser timing out on the operation.
back to top
- When I connect via HTTPS to an Apache with Mod_SSL or OpenSSL server with Microsoft Internet Explorer (MSIE) I get various I/O errors. What is the reason?
-
The first reason is that the SSL implementation in some MSIE versions has some subtle bugs related to the HTTP keep-alive facility and the SSL close notify alerts on socket connection close. Additionally the interaction between SSL and HTTP/1.1 features are problematic with some MSIE versions, too. You've to work-around these problems by forcing Apache with Mod_SSL or OpenSSL to not use HTTP/1.1, keep-alive connections or sending the SSL close notify messages to MSIE clients. This can be done by using the following directive in your SSL virtual host section:
Open the file with any text editor and carefully insert the code piece below in the appropriate place, around the directive for "SSLengine on", you may have to insert it in both the IF and the ELSIF portions of the setup:
$PerlConfig .= "Listen $ip:443\n";
$PerlConfig .= "\n";
# ------------- INSERT THIS CODE -------------
$PerlConfig .= "SetEnvIf User-Agent \".*MSIE.*\" \\n";
$PerlConfig .= " nokeepalive ssl-unclean-shutdown \\n";
$PerlConfig .= " downgrade-1.0 force-response-1.0 \n";
# ------------- END INSERT -------------------
$PerlConfig .= "SSLengine on\n";
$PerlConfig .= "SSLCertificateFile /home/sites/$group/certs/certificate\n";
$PerlConfig .= "SSLCertificateKeyFile /home/sites/$group/certs/key\n";
$PerlConfig .= join('', @ssl_conf);
Additionally it is known some MSIE versions have also problems with particular ciphers. Unfortunately one cannot workaround these bugs only for those MSIE particular clients, because the ciphers are already used in the SSL handshake phase. So a MSIE-specific SetEnvIf doesn't work to solve these problems. Instead one has to do more drastic adjustments to the global parameters. But before you decide to do this, make sure your clients really have problems. If not, do not do this, because it affects all (!) your clients, i.e., also your non-MSIE clients.
back to top
Frequently Asked Questions – Webstar
- What format do I need the certificates in to load them using Webstar V4?
-
The certificates must be provided in a single chain file in Netscape format. Please request this from support@digi-sign.com
back to top
- What format do I need the certificates in to load them using Webstar V5?
-
The certificates must be provided in a single text file in this order:
The customer certificate
Digi-SignClass3CA.cer
GTECyberTrustRootCA.cer
And there MUST be a blank line between
-----END CERTIFICATE-----
and
-----BEGIN CERTIFICATE-----
back to top
- Error: "bad unsupported format" when importing certificate
-
This error happens when using the Certificate Extractor utility. If you do not use the extractor to import the certificate, it should work OK.
back to top
- Error: "Netscape cannot communicate securely with this server. No common encryption algorithms"
-
This error is a known bug in earlier versions of 4D Webstar Server Suite/SSL. You should upgrade to the latest version, and make sure all fixes and updates have been applied.
If you are using the latest version, check that your SSL settings are correct. The server should be listening on Port 443 for SSL connections, and have the correct certificate and key file specified. Enable all ciphers. If you have not set up your server correctly for SSL, you may receive this error.
back to top